
AmbienceLayer - Timeline
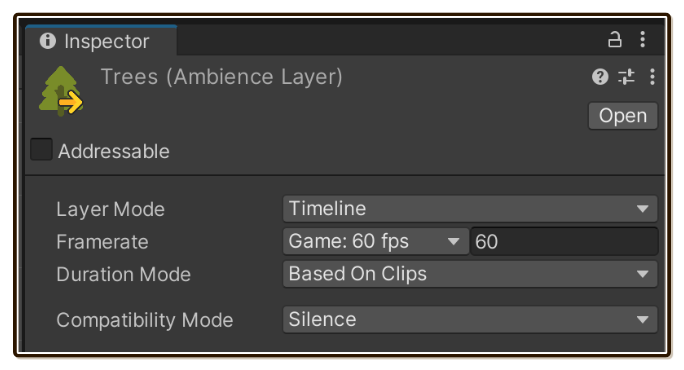
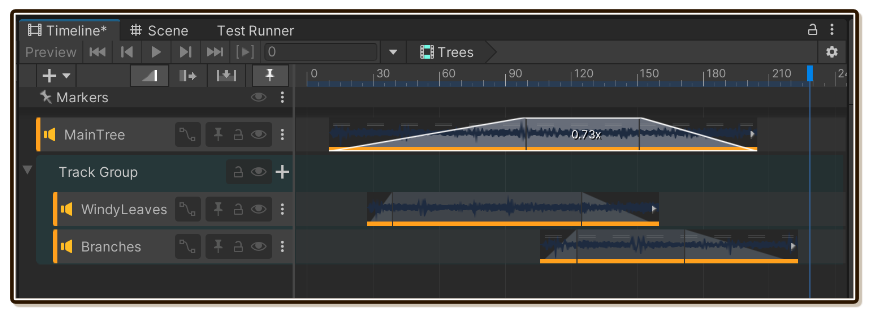
This mode loops linearly like Looping Clip, but instead of using one AudioClip, you get to visually design a new audio content on a blank canvas!
By utilizing existing clips and Timeline's creative tools to the fullest, you can get infinite variations of looping content with virtually no increase in storage requirement.
Creating it

AmbienceLayer can be created from right click menu. Select Tiny Ambience > Ambience Layer.
It starts with Looping Clip mode, change it to Timeline.
When to use it
Timeline is like a mix of Looping Clip and One Shot Program layer mode. It is linearly predictable like Looping Clip, but programmable like One Shot Program.
Use it to create long patterns where straight recording from the real source is space-prohibitive. Or to get creative using existing AudioClip creating something unrecognizable from the source.
It also works as One Shot Program without random elements, but with precise control over when and how each shot would sound. The "shot" is an individual clip in this case. Remember that you can stack up as many tracks as you like, and any clip can be anything you want.
Precise One Shot Program
You can also treat this type of layer as a precisely placed One Shot Program layer. A strict and rigid program. But you can design the sequence of shot as irregular as you like, for any length with little cost.
Using everything
Timeline layer has liberty of cutting bits and pieces of any clip and arrange or stretch them. This allows you to use AudioClip not meant for Timeline layer (For Looping Clip, or for One Shot Program) equally well.

In this example, I prepared AudioClip for each kind of layers with matching file name. But in Timeline layer, it ended up using every clips in an applied, subtler manner! You don't pay any more memory cost by doing this if all the clips that you pulled in the mix are already playing on the other layers. Since memory loads the source AudioClip as 1 unit.
How to edit the timeline
Actually this AmbienceLayer asset is a TimelineAsset. How to edit the content also works like a regular TimelineAsset :
- Press Open button on the top-right corner (cannot preview) then look at your Timeline tab.
- Connect this asset to any
PlayableDirector(can preview, but requires a scene) and look at your Timeline tab.
If Timeline tab is already docked somewhere in editor but is currently hidden, it may appears that nothing happened. Please click the tab to make it visible too.
Inside Timeline tab, press + button and select Audio Track (other kind of tracks doesn't make sense for our use). Start working by dragging AudioClip asset onto the track to create a AudioPlayableAsset (i.e. the timeline's clip). Have fun!
You can edit the timeline even if you are on Looping Clip or One Shot Program mode where the timeline data is meaningless. Unfortunately, no asset other than TimelineAsset or a subclass can contain timeline data right now, I had no choice but to bundle this together with everything else.
Creating a "timeline editor" prefab
An ability to preview the timeline is very helpful for audio. But Unity has restriction that you must have a real PlayableDirector inspected with that timeline asset attached.
It is a hassle to make an "editor PlayableDirector" in some scene just so you can preview. I recommends creating a prefab with PlayableDirector instead of using a scene. Then whenever you want to work on the Timeline you double click it to go into Prefab Mode (the blue background mode), PlayableDirector also works in there in Edit Mode.
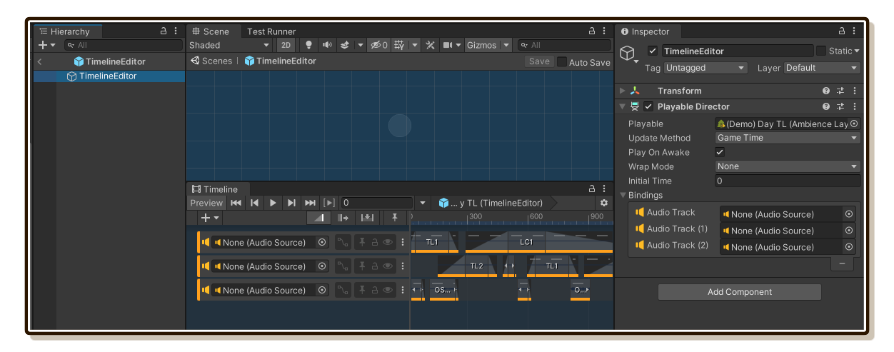
Timeline tab background also turns blue when you inspect a Game Object with PlayableDirector in isolated Prefab Mode. That is when you can press space bar to preview. Make sure you also attached AmbienceLayer you want to preview while designing to the PlayableDirector.
Timeline techniques
These are ideas. For a comprehensive tutorial of Timeline features, please see Unity Timeline Crash Course!
Slicing
If you drag left or right edge of clips inside the timeline, it can play just a part of the clip.
This is deceptively powerful, musicians that uses a sampler instrument before knows that waveform manipulation opens up tons of possibilities. You have this power in the Timeline!
Some sounds like birds are difficult to capture enough variations for use in game. With enough variations, you maybe reluctant to invest that much storage space for just birds.
Instead, try getting only a single clip of bird making sufficiently interesting sequence of chirps. You can then slice and rearrange it inside Timeline to get many more variations at the space of 1 clip! If you sliced a single chirp, you can even slow it down or speed it up to make it sounds like an another kind of bird. Reversing a clip can change it to otherworldly different animal completely...
Layering
You can create as many AudioTrack as you like, and even group them when it gets messy. Layering combined with careful crossfades on the clip's edge can create interesting sound.
It is all about timing, which you are in complete control in Timeline. Waveform display on the clip can help you line up peaks of different layers.
Composing
You can go out to record "materials" with this mode in mind in order to piece up your layer inside Unity, like composing a song.
For example, I would like an ambience of shimmering, "glassy" sound for my fantasy crystal cave that is totally not a knock-off of Elder's Recess. I can't go to the real cave so I shatter a real glass at home instead. In Unity, I can make multiple clips out of that sound, stretch out and position them, until a single glass breaking sound which wasn't an ambience starts to sound like an ambience.
Fill up with loops
Often your ambience sounds too empty because it has obvious gap in the timeline.
Normally you should always layer Timeline mode over at least 1 Looping Clip layer to ensure there is always something going on. But inside Timeline you can also easily use clips meant for Looping Clip mode and tick "Loop" check box on the clip, then you can fill in area with dead air.
Make sure these clips aren't touching the edge of timeline since timeline can't loop seamlessly. After several loops, fade out the edge to end it.
Automation

By pressing the "graph node" button on the right of your track's name, it reveals an area that you can draw automation curve throughout the track!
This works even more intuitively than my AnimationCurve-on-Inspector approach from the other 2 layer modes, since the curve is right under the sound wave and you can precisely time it.
You get a new set of graphs per track, not per Timeline. Have fun!
Volume
Stereo Pan
Other than Volume, it is so much fun using Stereo Pan graph to make the birds coming from the left and right, creating a complete orchestra of birds. The original recording may only comes at the center.
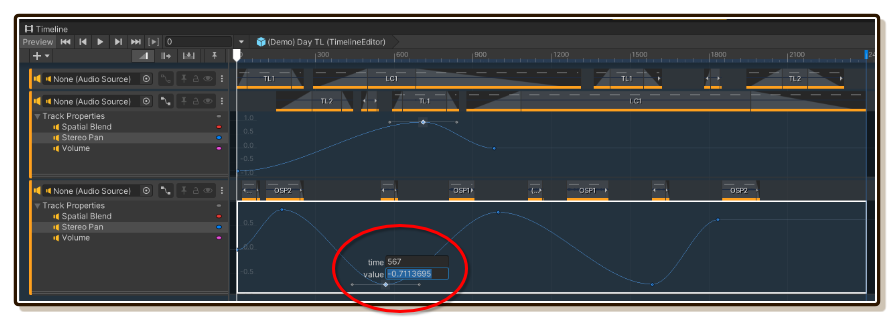
One gotcha is that Stereo Pan is center at 0, and therefore far left at -1.0 and far right at 1.0. The original graph has range 0.0 to 1.0 visible, drag the node to the bottom edge or press enter and type it in to get it to pan left.
It CANNOT loop seamlessly at the edge
At this point, you maybe thinking of putting a single track in here with one clip, and completely replaces the use case of Looping Clip layer mode.
There was a time Tiny Ambience had only Timeline and One Shot Program, until I realized that Timeline/Playable cannot loop seamlessly.
My guesses why Timeline struggles to loop seamlessly :
- Playables are not really made to loop "gracefully", but rather to be catch-all for anything playable (it may works fine for animation and other stuff). The looping code in
PlayableDirectoris just adding delta time andifcheck if over the edge, simply jumps back and add the left over. - Audio playable (audio clips in the timeline) while very flexible to the point that you can drag around the play head and hear the scrubbing like a DJ, it seems to evaluate a small delta time rather than "play" like
AudioSource. At the moment timeline loops with large delta time, it can't evaluate last bit of the end of timeline joined with front bit of the new loop in the same frame. - Audio is unlike animation. In animation we want to see the state where play head ended up. In audio we want to hear all the audio sample the play head passed through.
Ensuring no audio content at the edge
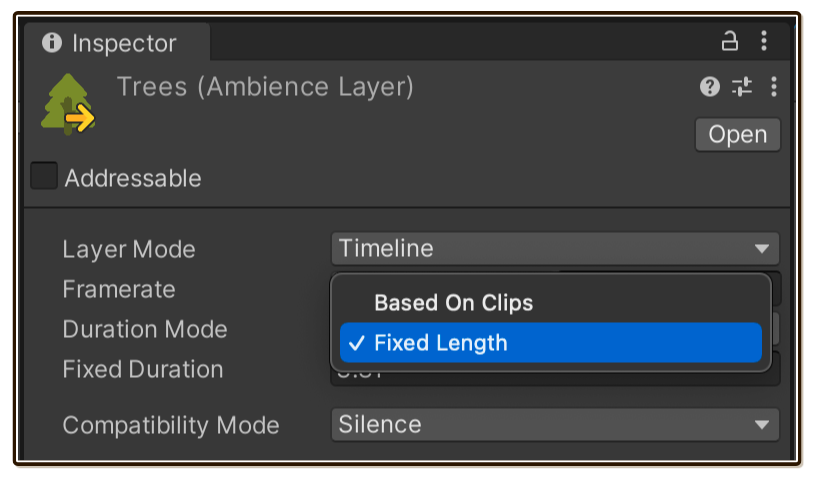
There is a Duration Mode settings on the asset, like normal TimelineAsset.
- Based On Clips : The first clip in your Timeline should be moved forward a bit, because you are forced to have audio content at the end.
- Fixed Length : Specify a time little bit higher than the end of your last clip.
Lag characteristic
Timeline is an evaluation machine, and I really mean it.
I once made some UI animation with Timeline/PlayableDirector before, and set extrapolation mode to None. When the game lags right at the end of timeline, after the game resumes, turns out my animation state froze at 95% instead of an expected 100% because that was the state before the lag! Extrapolation needs to be Hold to prevent this, even so I feel like this is a bug so I submitted this to Unity and they say it is by design.
In audio other than seamless looping situation it is not so bad, just that the audio may sound glitchier than AudioSource when the game didn't run smoothly.
Compatibility Mode
There is this strange settings when Timeline mode is selected. Compatibility Mode exists solely because Unity's track record of bugs involving Playables/Timeline. It determines what to do if Timeline would bugged out (lol), saving you from catastrophe.
I have made a dedicated page for this mode in Advanced tab : Compatiblity Mode.
Combining layers into an Ambience
- Getting Started/Ambience : When you have made sufficient amount of layers, it is time to create an
Ambiencethat is ready to play.