Unity Timeline Crash Course
You can learn about Timeline tab elsewhere such as in Unity Timeline Package Documentation or Unity Learn.
But since it will determine the outcome of your sequencing work in this plugin, let me take you on a tour of its features as well! Our version will be catered to audio, of course.
Everything are ASSETS!
The timeline asset you can probably see in Project panel is understandable that it is an asset. Because everything in Project panel are assets. But assets can be nested and you can't see.
In Timeline, whenever you do something, it is important to understand you are creating more and more nested assets. It is sometimes important to differentiate from when you modify inspector fields of ScriptableObject (also an asset), which you aren't creating any more assets but just changing properties of it.
What about PlayableAsset?
I understand that Unity's official documentation on Playables may looks very cryptic. I had been there. I hope this article can make something click inside you.
PlayableAsset is a "blueprint asset" of sorts that can reproduce a "playables" as many times as you like. The PlayableAsset is not playable yet!
The created "playables" can.. be played (duh). By "play" I mean it has a current time that could go forward. And something will happen as time passed. You can also pause, resume, stop.
Therefore it is understandable that TimelineAsset is a kind of PlayableAsset right?
When you give this asset to PlayableDirector, it turns the blueprint asset into a really playable data (not asset anymore, but can be played), then it keeps adding delta time to make something happen.
This "something happen" is making sounds if the timeline is full of just audio tracks.
Creating the track
AudioTrack is actually a saved PlayableAsset nested inside your TimelineAsset, which is also a PlayableAsset that you can see in the Project panel. It is impossible to have a dangling AudioTrack asset in the Project panel.
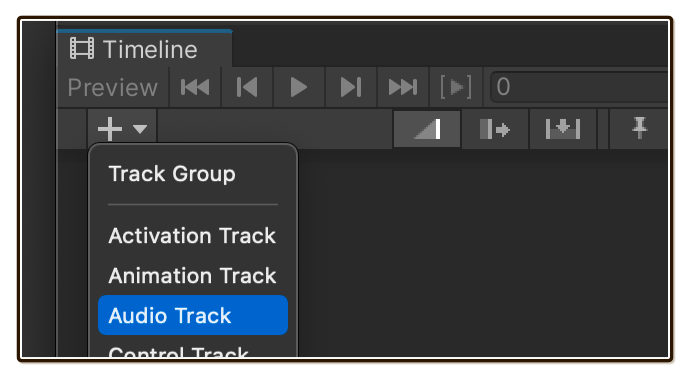
Starting from blank timeline, press + button to open a menu. Select Audio Track. You have created an asset at this moment.
One other relevant track for our use case is the Track Group. It has no effect on audio, but can make your timeline really neat!
Creating the clip
All these rectangle clips lining up in a track are, again, PlayableAsset. In this case, the asset is called AudioPlayableAsset.
Unlike AudioTrack, it is possible to have standalone clip assets inside your Project pane, then use it in Timeline by reference! But for now, let's bundle this asset inside the timeline.
We can create them in several ways :
Dragging compatible asset into the timeline. In this case,
AudioClip."Dragability" is determined by if the resulting clip asset has one reference field to that thing or not. In this case, you can clearly see in the clip inspector that it needs one reference to
AudioClip. Timeline see this, and allow you to drag anAudioClipin as a shortcut.
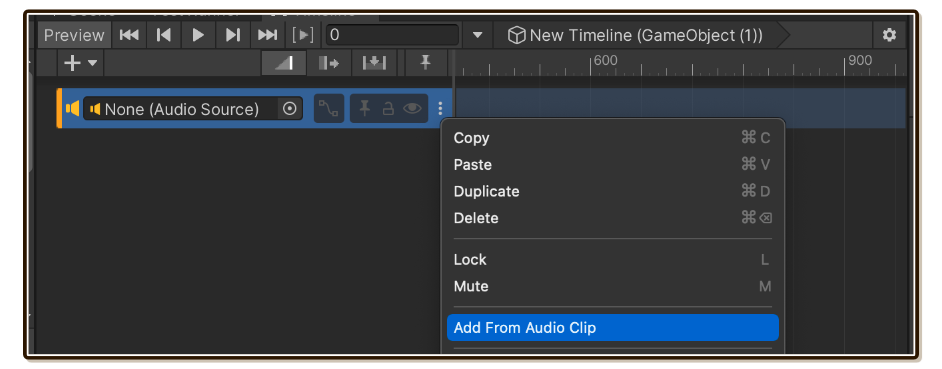
Use the 3 dots menu or right clicking on the track and select "Add From ___". Menu here is populated by scanning assembly for compatible clip asset type to this track, then look for the first reference field on it what it wants.
Technical : How could the clips be a PlayableAsset?
It is easy to imagine that TimelineAsset blueprint can create a playable (has time, can play) and also each AudioTrack blueprint can create a playable as they are parallel to the timeline (sync the same time as timeline, playing/stopping together with the timeline).
How about the clips inside each track? They are in serial. What is the "play"? What is their time?
The Playable Graph Visualizer can solve this mystery for us. Look at this as long as you like.
The yellow outline means I am inspecting that playable, and its info are displayed on the right.
From the graph, it may looks like all the clips are suddenly in parallel instead of serial. But how the graph turns this parallel back to serial is by having an another mini-playhead inside each clip, which takes turn running.
The inspector says Time: .95 because I just played one round and it is currently stuck at the end. As soon as the (big) play head touches the left edge of the clip, clip's local play head starts following immediately.
This way, you can understand that something lined up serially can also takes on running time from outer layer that are parallel.
The fades are simply implemented by animating graph weights. At the moment of crossfading, 2 clips are both in Playing state. The mixer decides how much audio to get from each.
Selecting multiple clips
Most of these works intutively like in your operating system.
Area selection by dragging is possible. Holding either
ShiftorCmd/Ctrladds to the selection.
Holding
Cmd/Ctrland click can select any individual clip one by one.
Holding
Shiftand click can select all clips in-between selection range. Note that if you select clips on an another track, the result maybe ...weird.
Double-clicking empty area on the layer selects all clips in that layer. This is quite useful in audio editing as you may want to shift the track to line up somewhere else with the other tracks.
Horizontal scroll
If you don't have a good and big touch pad like in Macbook Pro, it is painful to work on the timeline where time flows horizontally then you have to always drag that little horizontal bar.
Instead, hold Alt/Option before dragging to "grab the timeline". You can do this no matter how busy the timeline has become.
F for Fit, A for All
You will be glad you know these shortcuts. They are originally used in Animation tab. Also works here!
F: Fits the view to accommodate all selected clips. Select multiple clips with dragging an area selection or holdShiftand click on each. If nothing selected, it works likeA.A: Fits all clips available in the timeline. This doesn't mean you will see an entire length of the timeline, you just see all the clips.
M for Mute, L for Lock
You can click the eye and the lock icon, but pressing these M and L keys is easier.
- Mute : Mutes the audio in this layer. Use it when you want to temporarily try out how it sounds without some problematic layers. In audio mixing sometimes you have to try discovering when would "less is more" is the right choice.
- Lock : Prevents accidentally selecting and moving clips on layers you are done working with. This is useful with area selection dragging since you can drag covering locked layers without them being selected.
Copy-pasting
Cmd/Ctrl + C then Cmd/Ctrl + V works as expected, it will be pasted on the current play head position and highlighted track. (Possible to paste to an another track if the clip is compatible.)
Not just clips, the track is also copy-pastable. It copies all the clips inside.
Some details, you are actually copy-pasting the asset. Adjusting values of the new clip in the inspector will not affect the previous instance you copied from, as expected.
But recall that clip can stay in Project panel too. If you dragged clips from outside the timeline repeatedly instead of copy-pasting, then the clips are linked by reference. Adjustment on the original clip in your Project panel will update all the clips.
Ripple move
Sometimes you want to nudge an entire track, but only from one point and later because you had arranged everything before this point well already.
Hold 2 key to temporarily turn on Ripple Mode. Dragging a clip while this mode is on shows yellow bar on the left edge, indicating that anything before that point won't be moved.
Trimming/Extending
Dragging the left and right edge can trim the clip as expected.
Notice when we drag the left edge, a bunch of fields in the inspector changes! That is what actually happen at clip data level. You will be glad you have a nice visual interface to work with the clips.
Left Edge
This is deceptively simple, but it means you can start playing the audio from anywhere in the clip.
Combined with trimming away the right edge too, it now means you can play any fragment of audio in the clip.
If you are trimming the left edge with intention to get a new audio content at the beginning, but the left edge is already at the correct time, instead just modify "Clip In" in the inspector. It is like trimming then move back the clip to compensate.
Right Edge
- It makes the clip shorter than its content. A short fade out can reduce popping sound resulting from cutting off audio in bad place.
- Extending it is used in looping, otherwise you are extending just silence. Let's talk about looping now.
Looping
Inspect a clip, check "Loop", and extend the right edge again. You will see audio content instead of silence.
L1,L2, ... and so on shows rounds of looped content when a clip is inspected.Loop content will always be full clip content. Trimming left edge of the original round will not make the looped round also trimmed. For that, you will need to copy-paste a trimmed clip lining up serially.
Each exact loop has snapping so you don't take in a bit of next loop's audio by mistake. If you are messed up by other snappings it is hard to make exact loop rounds, use right click menu Editing > Complete Last Loop / Trim Last Loop.

Use "Clip In" to infinitely offset audio content when Loop is on.
Stretching/Compacting
This is an extremely fun operation for audio works on the Timeline.
Officially known as clip's "Speed Multiplier", but the way Timeline present it combined with waveform display on the clip, it feels like you are stretching it out rather than technically make it faster or slower!
Hold Shift while dragging the edge to stretch/compact the clip instead of trimming. This is one of the operation that shortcut key makes a lot of different since seeing waveform stretch out while dragging the edge is so satisfying.
If a clip is looping, it can stretch all loops. Looping and stretching together let you fill in any length silence with any audio content, provided that they are not too strange-sounding after.
Fades
This is officially known as "Ease In/Out".
Fading at the edge is very useful to make different audio clips work well together. A single clip trimmed at the edge can also benefit from very small fade to make the cut smoother.
Hold
Shiftwhile dragging the clip's edge to fade it instead.
Drag the clip to overlap each other automatically crossfades them. If you do not want this "Mix Mode" behaviour, hold number
3to temporarily turn on "Replace Mode".
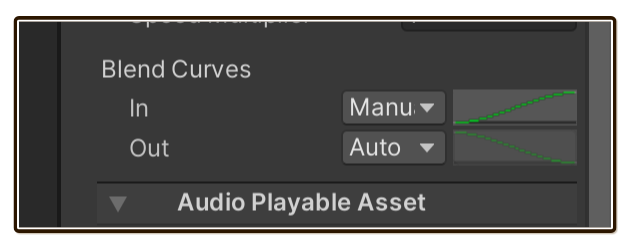
The shape of fades
I was so excited when the music making software I was using introduced an ability to do this for the first time :
Actually it is possible in Unity too, though the waveform won't dance around nor you will see an actual shape of curve on the clip. (Get on it, Unity!)
To do so, use this Blend Curves section. Change Auto to Manual then you will be able to draw any curve. (The timeline will still display linear fade.)
S for Slice
It looks like this feature is made for audio, because you can see the waveform and know what you are getting.
First, it requires a PlayableDirector to get a movable play head while editing.
Position the play head to where you want to slice, inspect that clip, then press S key. The latter half of the slice is automatically inspected after, so you can continue slicing. I had tons of fun with this feature!
Track properties
In my opinion, this feature is very well hidden. When you inspect the track, the inspector would also display something adjustable!
Track asset name
Track's asset name is up top. (Knowledge that each track is in fact an asset comes into play now!) Is it important to name it? The name of track was on display when you have no clip, but as soon as you have a single clip, the track name is replaced by binding box so you may think it is a waste of time to name.
But you can edit TimelineAsset directly without PlayableDirector (can't preview) which the track name will be shown. I suggest naming them nicely.
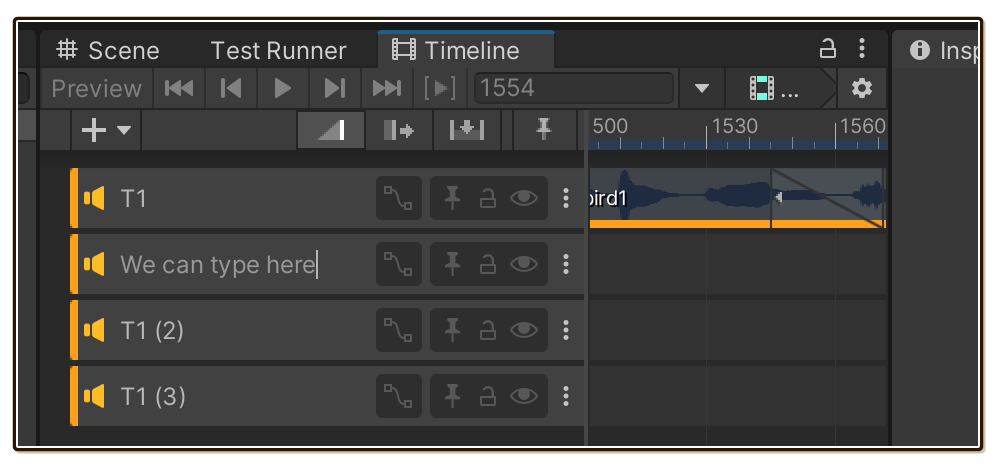
A faster way to name many tracks is to edit without PlayableDirector so the names are shown, then click on the name and start typing. (It doesn't look like a text box, but it works.)
Properties
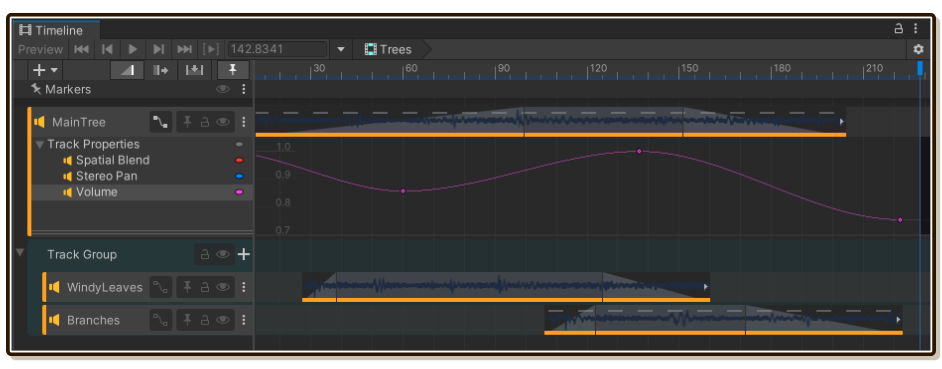
AudioTrack has 3 properties :
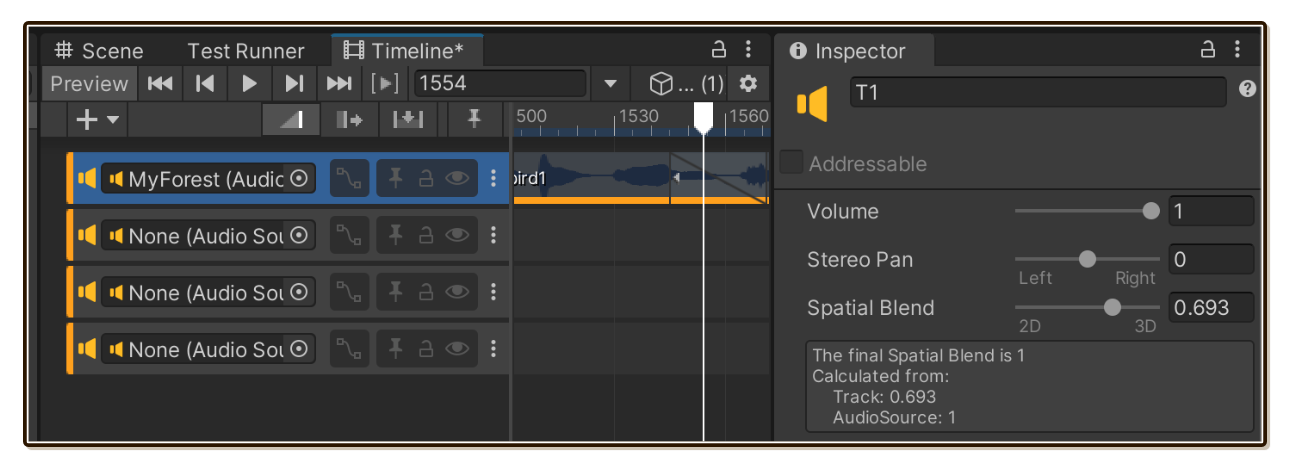
Volume : This is per-track. Very useful, as it is now meaningful to have multiple tracks other than organizational purpose or to overlay clips. You can now balance them later!
Stereo Pan : Deal with busy mix on track level. Taking clips to the side may make the center stage better.
Spatial Blend : This is a bit tricky, it is greyed out if there is no
AudioSourcebound to the track. So impossible to adjust if you edit theTimelineAssetwithout thePlayableDirector. Probably because it wants to display that help box showing the final Spatial Blend that takes the source into account too.As for use case, imagine if you have a 3D source and listener is really far away from it it is not audible at all. If you use this curve to dip a bit from 3D to 2D, it became audible even when out of range! How to use this creatively is up to you.
Animating properties
Clicking the "graph node" button on the track to open graphing area to animate those 3 properties. It is important to understand we are animating those properties, you can't have both curves and also one more property adjustments earlier. (It will be rendered in blue tint, indicating it is being animated.)
Naturally, this feature is very powerful in Timeline audio editing. Even a bland audio clip that loops several time can benefit from animating curve spanning over multiple loops to sound more dynamic.
You are all set!
Thank you for taking this audio-specific Timeline crash course! Now you are ready to get creative and create some composite audio!