Ambience
Technically speaking, Ambience is just a stacked-up AmbienceLayer.


The user of this asset is the AmbienceSource, which it takes in a single Ambience and accommodates resources required to play for all AmbienceLayer available, depending on Layer Mode of each.
Getting started

Ambience can be created from the same right click menu as AmbienceLayer. But this time, select Tiny Ambience > Ambience.
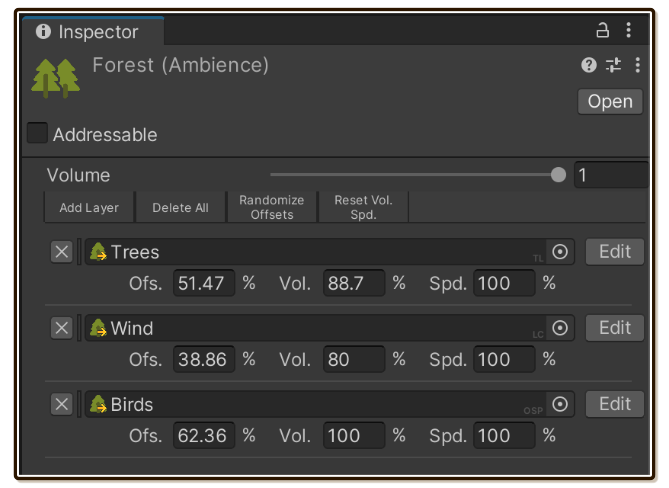
Inspect the created asset, press "Add Layer" button on the toolbar, then use the asset picker to assign AmbienceLayer you have made. Repeat until you are satisfied with the design.
To test play, you will need a real scene with AmbienceSource. We will cover that in its page.
Overall volume adjustments
Right at the top before you can assemble your layers, there is a settings that affects an entire ambience as a whole. Currently it is just a "Volume" slider that you probably could guess what it could do. But I would like to talk a little bit about it!
Supposed you don't have this slider. Each layer will in the end be made from AudioClip, which was normalized by the audio designer to some standard like -6 or -12 dB. Each layer has their own volume adjustments. If the bird layer is quite loud at -6 dB mastered, you may reduce the volume to 30%. On the other hand, the "air" Looping Clip layer will be extremely loud at -6 dB mastered, you put in low number like 1~5 % volume.
Though, what if you found out that the whole thing maybe too quiet or too loud in the game? (Though relatively, the layers are balanced.) Now you have to change both 30% and 1~5% to something else while preserving the same balance. This is annoying! Adjusting the volume on the source that will play the ambience is also annoying, as it will affect other ambiences that may already have alright volume.
Instead, use the layer's volume adjustment only for balance between layers, and make the whole thing around -6 dB or -12 dB loud like each individual AudioClip. This will be incredibly loud for ambience standard! But you have that overall volume slider to make it sounds good in the game. Now you can make it quieter from that -6 dB as you like.
Layer mode indicator
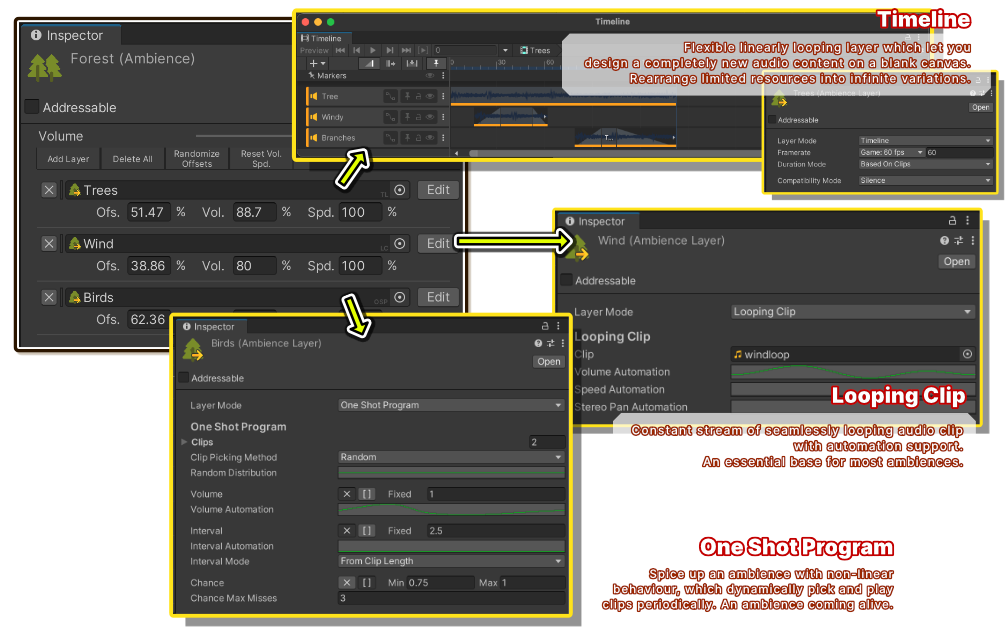
The little "LC", "OSP", and "TL" text on the asset picker shows what is the Layer Mode of each AmbienceLayer :
- LC : Looping Clip
- OSP : One Shot Program
- TL : Timeline
Adjustments
Ambience additionally pair each layer with some adjustments that you can once more get creative with. These settings are serialized in the Ambience asset, not inside each AmbienceLayer you use.
These are "Ofs." "Vol." "Spd." you see in the picture. Sorry for abbreviations but I want to get the editor to display each layer as compact as possible.
No live adjustment guarantee
To allow various optimizations, sources already playing the Ambience maybe "detached" from the Ambience and AmbienceLayer asset files. (Such as copying and baking volume value in to automation curves.) When you change values on the asset while in Play Mode, likely they wouldn't affect the sound in real time.
To apply changes, you will have to stop and play again. If you right click on AmbienceSource there is a handy "Restart" context menu that performs Stop + Play for you, essentially applying changes from all related assets.
Offset adjustment
The purpose of Offset Adjustment is to create syncopation. When multiple layers starts at different points the audio could get more interesting.
Because all layers are looping, any number of offset will work! I go as far as providing "Randomize Offsets" for you on the toolbar above in the case that you just want to randomly staggers everything.
Layer mode : Looping Clip
It simply set the current time of the clip to a specified percentage of the total length before play.
Layer mode : One Shot Program
One Shot Program does not really have a defined length to offset because it is non-linear. It just continue to fire the shots according to behaviour you programmed.
Instead, offset will be simulated. Recall the One Shot Program steps. Instead of performing Clip Picking Step first on play, it starts on Wait Step instead.
Wait time is determined by pretending to perform Clip Picking Step to serve as a virtual one-shot that imaginarily occurs before this moment. The offset percentage is then applied to this wait time, resulting in a potentially shorter than normal wait time before the first Clip Picking Step begins.
Layer mode : Timeline
Straightforward like Looping Clip. 0% is the beginning of timeline. 100% is the end of timeline.
Volume adjustment
Volume Adjustment is easy to use and powerful. Here are some tips to use it :
- Because of this feature, it is more flexible if your source
AudioClipmaterial is sufficiently loud, and also yourAmbienceLayeris loud. You can always lower the volume atAmbiencelayer. This way, wind may sounds like a storm when you audition it but after going through adjustments it sounds natural. Then later on you can also use it as strong wind. - If you are building a new
Ambienceand is lacking materials, try using oldAmbienceLayerthat seems completely unrelated but make Volume Adjustment very low (and perhaps also adjust the speed) to create interesting texture. My river ambience contains speed-up rain layer at 1~5% volume and it sounds quite nice.
Volume adjustment over 100% only works for Timeline layer. Playables interpret weight as volume, and weight can go over 1.0. On Looping Clip and One Shot Program, the number is transferred to AudioSource's volume which maxed out at 1.0, unfortunately.
Speed adjustment
This is a great way to change characters of layers you have made. Since audio speed/pitch in Unity stretches the audio, the audio will get brighter and darker, pitch goes up or down, as well as playing faster or slower.
Usually this is undesirable in something like vocals, since you want to speed up or slow down preserving the pitch and timbre. You don't want to turn into chipmunks with speed increased or turn into zombies with speed decreased.
But in ambience design it is great! Subtle adjustments can make many variations of the same layers without taking more device space. Also at the same time don't be afraid to play with this one. For example, a night time crickets layer can easily turns into parrots with speed considerably lowered!
Edit button

You can left click on the asset picker to ping the asset, then left click the pinged asset to inspect it. The Edit button simplifies this process by "opening" the connected AmbienceLayer asset immediately.
It works differently depending on selected Layer Mode of that asset :
- Looping Clip/One Shot Program : Opens a dedicated pop-up inspector with the asset inspected. Note that if you double click the asset picker when
AmbienceLayeris on Looping Clip/One Shot Program mode, it will opens the Timeline as per Unity's default behaviour, which does not make sense because in these modes we ignored the timeline data. That's why I made the Edit button in the first place. - Timeline : Opens the Timeline tab if not in the editor yet, then assign the asset for edit. Only works if you have Timeline package version 1.5.2 or higher, otherwise will be greyed out. In that case, you can double click the asset picker to get the same effect.
Color tag
This is kind of a hidden feature at the moment. The little strip between the X button and asset picker is actually a color picker.
It is just used to decorate your Ambience so it maybe easier to find the right layer when it gets more complex. In the future I would like to provide sorting function that can sort according to hue of these colors.
Playing this ambience asset
- Getting Started/Ambience Source : Finally we made it, it is time to play and hear our beautiful ambience!