Installing
The standard of installing Asset Store package today has become installing with Package Manager (Window > Package Manager) instead of Asset Store tab.
If you installed Unity official packages from there lately, you will notice that they no longer go to your Assets section, but in your Packages section instead.
This is because they are Unity Package Manager (UPM) with a proper package manifest (package.json). How Samples and Documentation should be included is also standardized.
This is a very modern way of using packages while keeping Assets content only your game, much like front end web development where external packages are all in node_modules.
1. Classic importing install
Tiny Ambience is a modern package that is UPM-compatible. But unfortunately, everything from Asset Store is still installed in the old way : by pouring everything into Assets.
We have to install this way first, then optionally, you can keep going to make it beautifully full-UPM, just like all those Unity official packages.
- Purchase Tiny Ambience from the Asset Store.
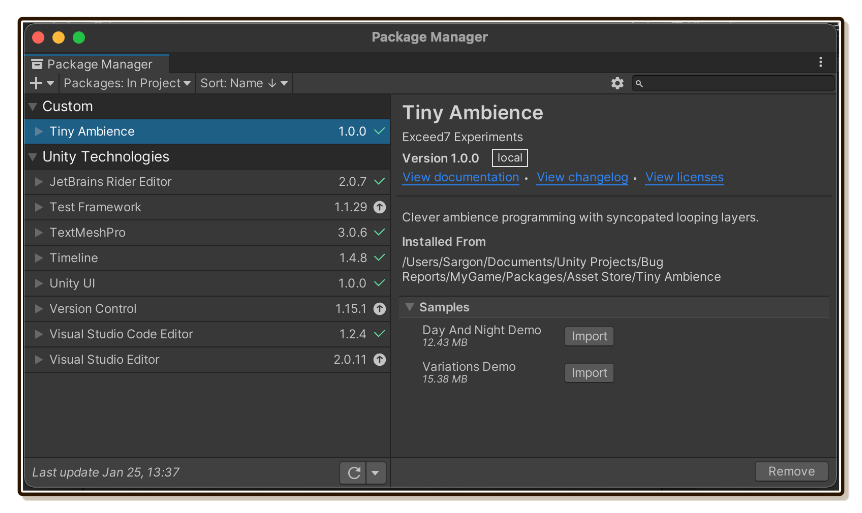
- In Unity, select Window > Package Manager. Ensured you are signed in with the same ID you purchased the plugin, then choose Packages: My Assets from drop down on the top left. You should find Tiny Ambience among those.
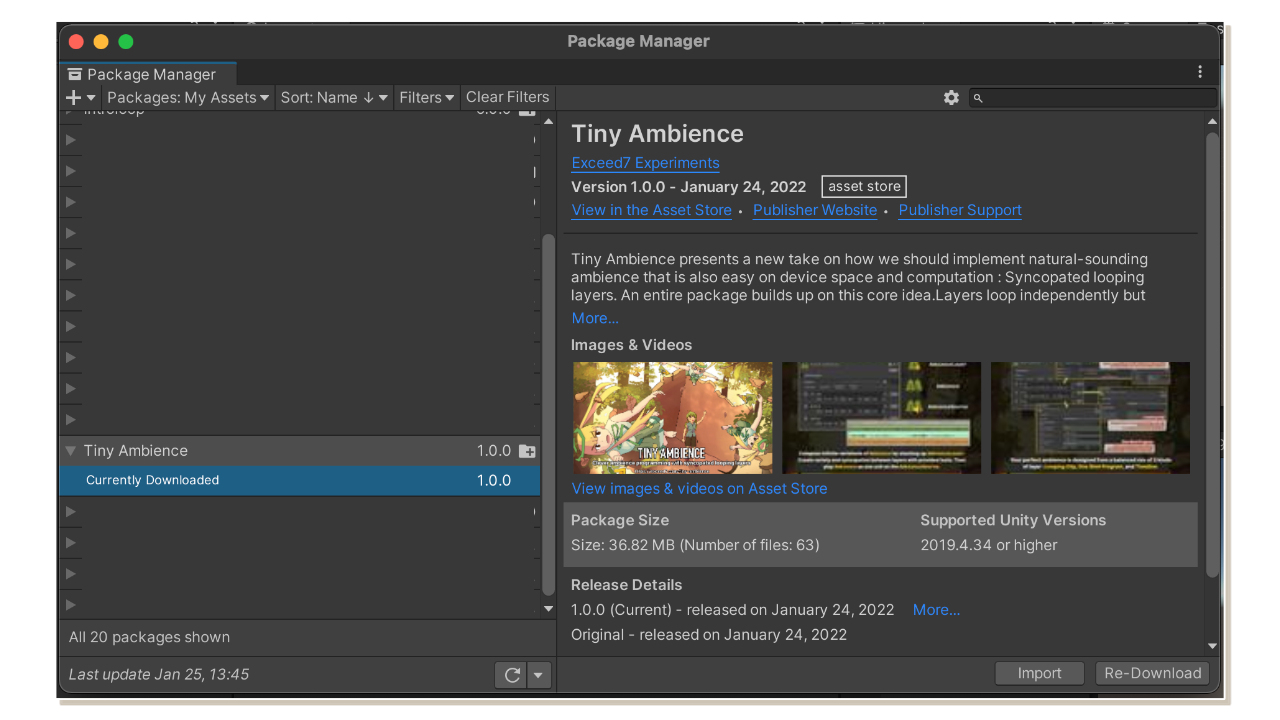
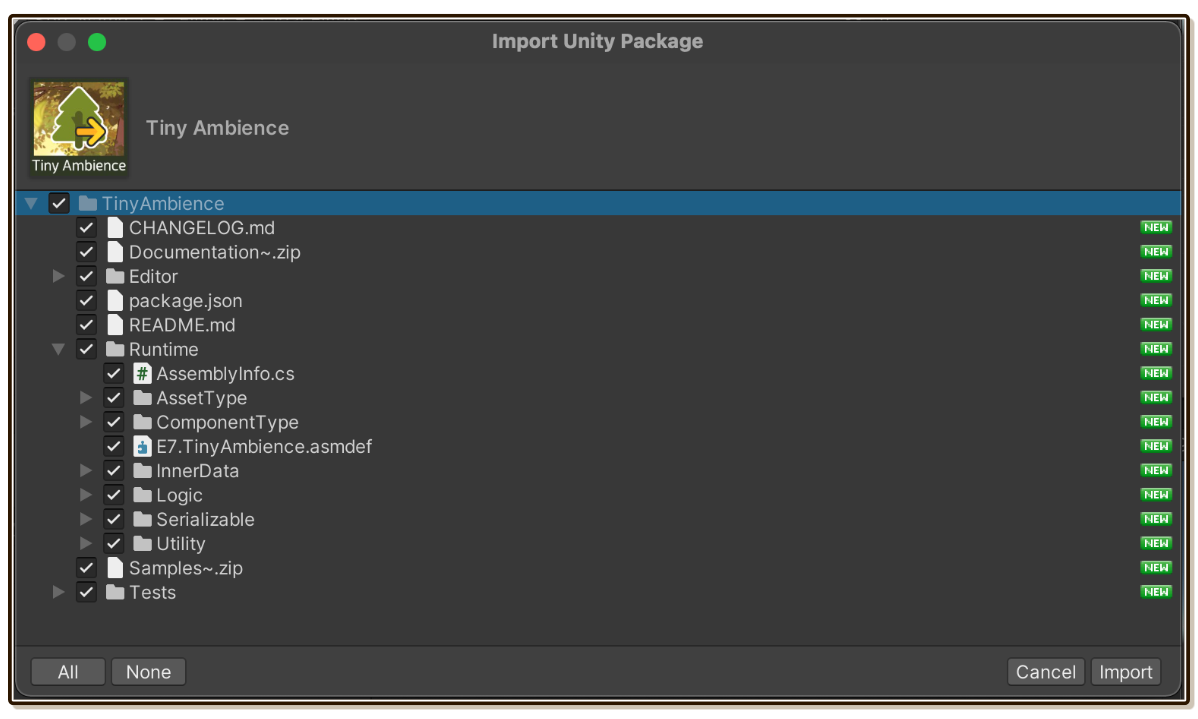
- Press Download and then Import. A popup to import will appear. Confirm and
Tiny Ambiencefolder will be imported into yourAssets.
You can now start creating AmbienceLayer assets, or attach MonoBehaviour component such as AmbienceSource to use your creations.
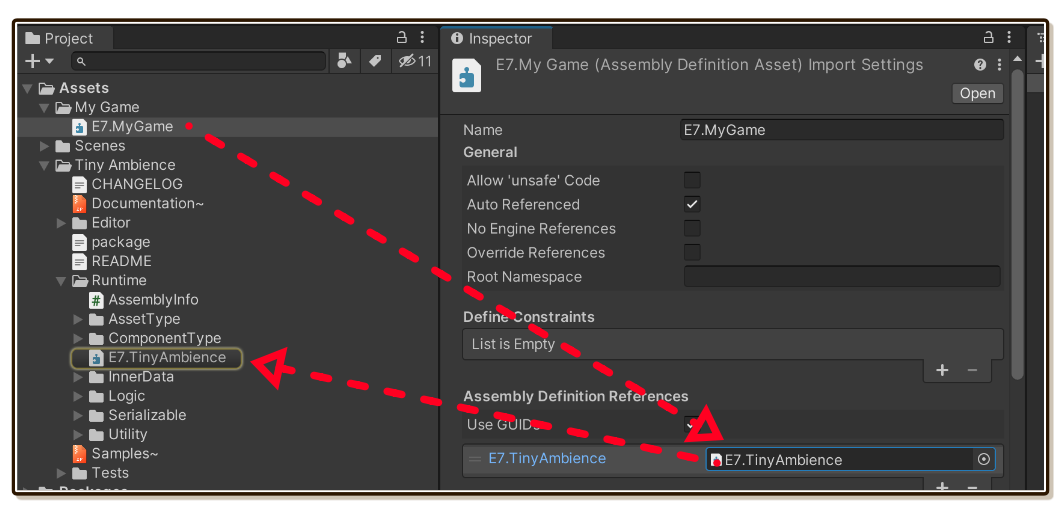
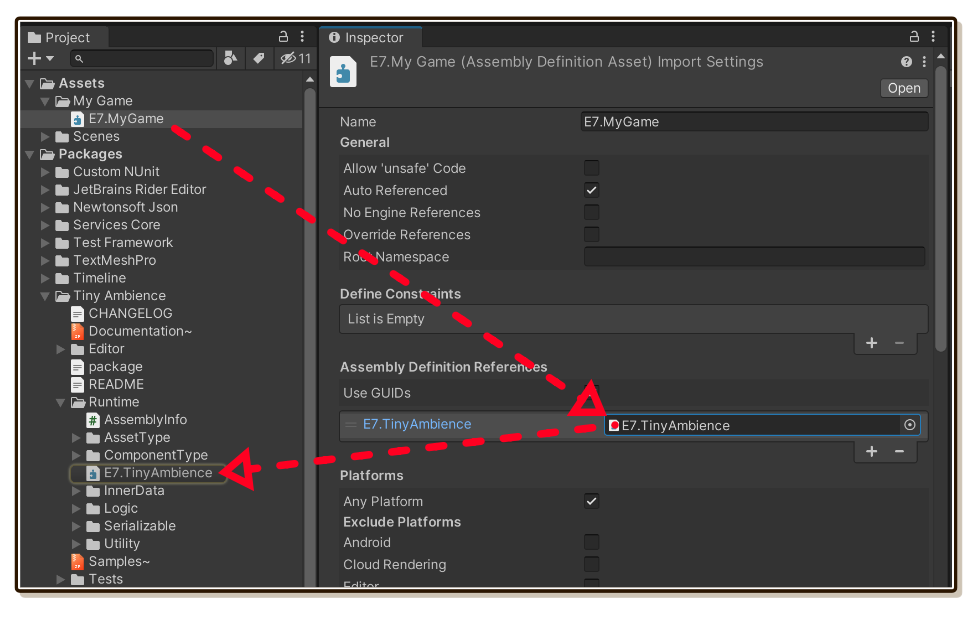
For C# scripting, if your game is using Assembly Definition (.asmdef) you will need to specify reference to the newly added E7.TinyAmbience.asmdef file inside the newly imported Tiny Ambience/Runtime folder.
2. Unzip offline documentation and samples
Unity now has standardized how Samples and Documentation should be included with the package. By naming the folder as exactly Samples~ and Documentation~, Unity will skip importing them (due to trailing ~), yet you can access them via your PC's file explorer or even the Package Manager.
Again, unfortunately, Unity's own Asset Store submission tool skips uploading those standardized Samples~ and Documentation~ folders. I have to archive them in Samples~.zip and Documentation~.zip instead as a workwround. Manually unzip both with your file explorer to access them.
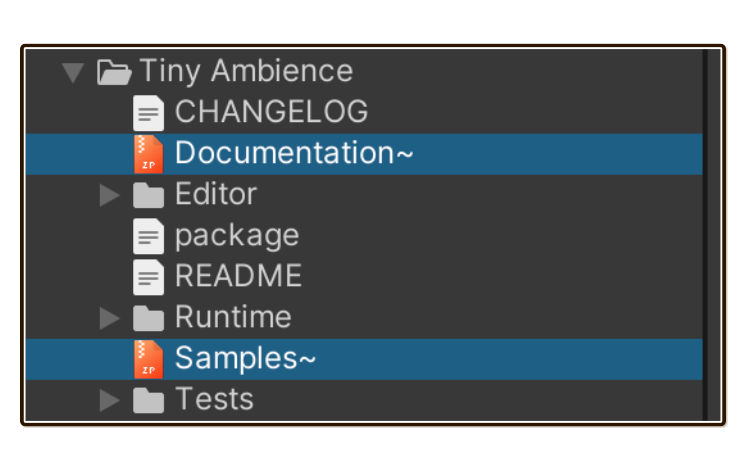
Documentation is in fact an entire official website, which you can read offline with any Markdown reader. All links and images work just like in the online website.
Samples should be imported into your project outside of
Tiny Ambiencefolder, since they are examples of how to use Tiny Ambience from user's perspective.Copy the content out of unimporting
Samples~folder into yourAssetsfolder, Unity will import them, then you can open the sample scenes inside.Each sample is individually wrapped in Assembly Definition (
.asmdef) that references intoE7.TinyAmbienceassembly to use it, just like you would. More about these samples in Demo and Samples page.
At this point, you can delete Samples~.zip and Documentation~.zip to save some space.
3. Upgrade to modern UPM install
After you have unzipped Samples~.zip and Documentation~.zip, now the content of Tiny Ambience folder follows the Package Layout standard exactly.
You now have a chance of taking everything out of your project and reference it with UPM's package.json feature instead.
The package right now should be in
YourGame/Assets/Tiny Ambienceafter you imported it from Package Manager.Move an entire
Tiny Ambiencefolder out ofAssets. This can beYourGame/Packages/Asset Store/Tiny Ambience, for example. It is recommended that the path is short relatively from your project'sPackages/manifest.jsonfile, and is also still under your game's version control.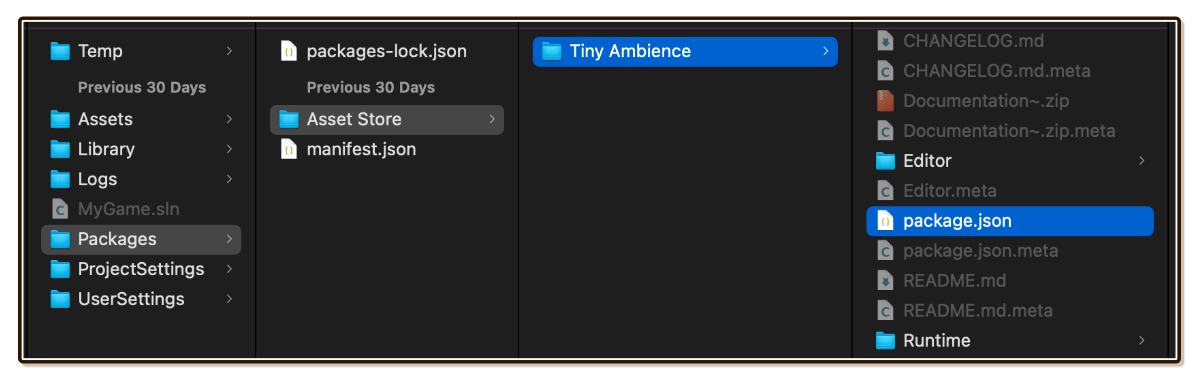
Open Window > Package Manager and press the plus
+button at the top left. Select Add package from disk... and browse to where you putTiny Ambienceearlier. Select itspackage.jsonfile.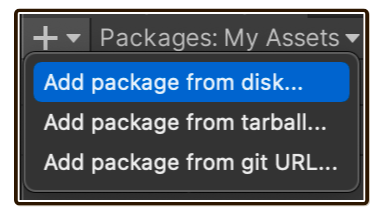
Your project's
Packages/manifest.jsonwill change to record this reference. Note that the path is also relative toPackages/manifest.json, seeing that it immediately starts withfile:Asset Storefolder we named.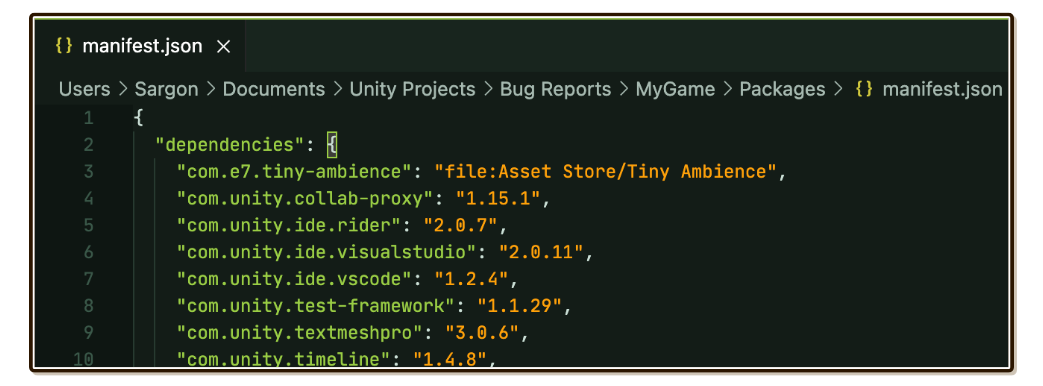
Congratulations! You are now a step into the future of Unity. First, the package now appears in Package: In Project section of Package Manager. Even better, the blue View documentation, View changelog, and Samples section down below also works. (Because you unzipped Documentation~.zip and Samples~.zip earlier, making the result conforms to UPM standard.)
Moreover, Tiny Ambience now cleanly stay put in Packages section instead of Assets. Assembly Definition link crossing from Assets to Packages works.
4. Finishing touches
This is yet another optional step to bling up your install even further than UPM-referencing. I am all-in for the package ecosystem, so I would like to share some awesome tips here!
Packing into tarball
When you look in your version control, a lot of files from Tiny Ambience appears as new additions. This is also the case for all classic Asset Store install.
We can make it better by packing the package and then use Add package from tarball... under that plus + button instead. Now Tiny Ambience updates in your version control under only 1 entry!
Unity's package.json follows the same standard as npm. We can borrow npm's packing command for this task.
Ensure your terminal can use
npmby installing it.Go to the
Tiny Ambiencefolder where itspackage.jsonis using your terminal.Run
npm pack. It will produce a file named like thiscom.e7.tiny-ambience-1.0.0.tgz. You can now delete everything else, including theDocumentation~andSamples~. They are all packed in.tgz.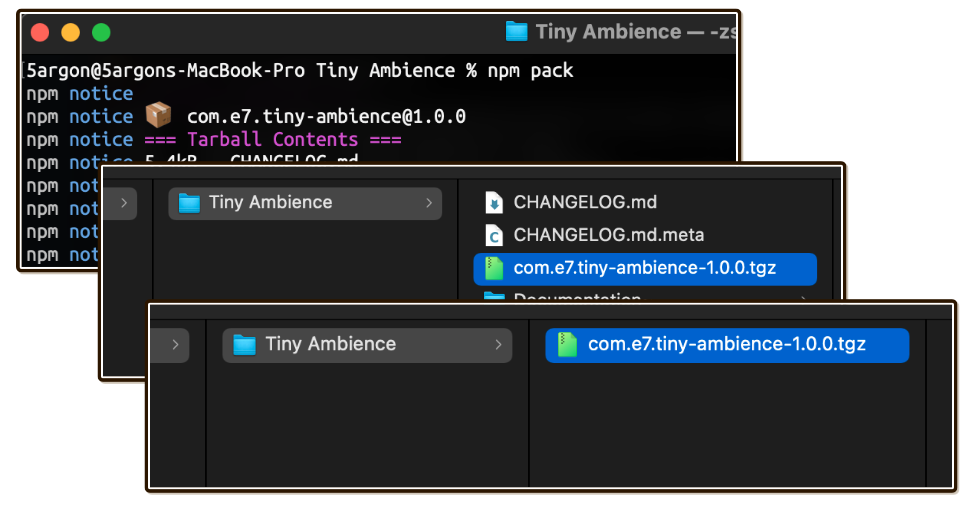
Use "Add package from tarball..." under that
+drop down instead of "Add package from disk...". Everything should work the same, except your version control is much cleaner. Editor like JetBrains Rider even could follow the code into the.tgzand edit the innards!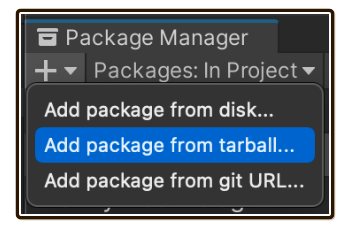
Serving the package for multiple projects
Perhaps you are developing multiple games, or a single game that is divided into multiple smaller Unity projects, or just want everyone in the company to be able to use the tarball from a shared directory.
A step further than that would be referencing that .tgz you made from multiple projects, so anytime you update the package, it is reflected in all projects. (You still have to follow Asset Store EULA of your purchase, which is licensed per seat.)
To do that, you may have brittle local path problem because all projects must now travel from Packages/manifest.json to central location somewhere in your PC.
The right way to do this is to run your own package registry. This is now out of scope of this documentation, but I just want to mention that my packages are possible to be organized that way, because they are in UPM-format.
- See the official Scoped Registries documentation.
- See how OpenUPM did it for better understanding. I also have open source UPM packages hosted there such as Notch Solution. I am excited by the future of packaged development in Unity.