
AmbienceLayer - One Shot Program
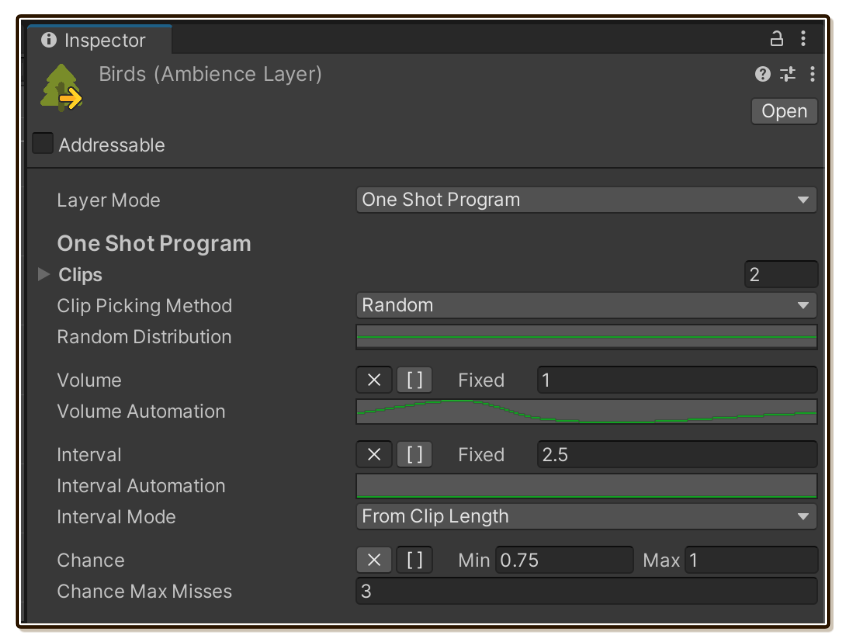
One Shot Program is a layer mode used to make your AmbienceLayer literally coming alive, since you can add behaviours rather than just endlessly looping a clip.
Creating it

AmbienceLayer can be created from right click menu. Select Tiny Ambience > Ambience Layer.
It will starts with Looping Clip mode, change it to One Shot Program. You will then see many fields for programming the routine appearing below.
When to use it
Ambiences are often associated with steady stream of complex audio made by nature. But sometimes there are "significant things" occuring in there. Something worth mentioning, yet you still consider it part of an ambience instead of undesirable sound.
- Morning time at rural farm is often portrayed as vast field with chicken. It's not morning without the chicken.
- Thunders in heavy rainstorm.
- Inside train, in addition to constant railing sound, occasionally the machine may have to do something that make unique sound. (So sorry that I am not knowledgable about trains..)
- Cafe ambience may need a sound of customer occasionally opening door, or someone cleaning up the steam wand of an espresso machine.
- Machienery that works in cycles or intervals makes significant sound again and again.
Common thing for these characteristics is that there are one-shots inside the ambience.
Why can't we use Looping Clip/Timeline for this?
Looping Clip and Timeline layer mode produces linear and deterministic result. If you just loop these significant one-shots the player will quickly pickup a pattern and it will get repetitive.
It is better to create a behaviour for these one-shots instead of playing linearly. How often should it plays the one-shot? How many kinds of sound could it make? Does it has a chance of not playing the audio sometimes? Or will it have slightly varying volume each time it plays?
You need a way to program this, preferably without writing code.
One Shot Program mode

You may have had implemented something like this in your past projects : A method that StartCoroutine, which PlayOneShot on its own with configurable delays, varying volume, etc.
This is exactly that, but glorified with more programming options suitable for ambience.
Programming by playing with a limited set of parameters will encourage creative thinking working on what you have rather than precisely writing code down to get an exact timing you want. Tiny Ambience provides quite a variety of parameters as far as PlayOneShot could work with.
But One Shot Program alone is like soup with quality meat but stock made from plain water. Make an Ambience with balanced combination of Looping Clip, One Shot Program, and Timeline layers is the key to lifelike ambience.
Advantages for sound designers
In your team, you may have a sound designer guy that not only use music software, but also use Unity to place AudioSource in the scene visually or use Timeline to place audio clips. Team member of this position won't write C# code.
But when audio needs to be behavioural, often it needs some talking with the programmer how exactly the designed audio clip would be played.
With One Shot Program, the team can teach the sound designer to use the inspector to program it. Programmers only need to know when to play and stop, not having to know about any behaviour inside it.
Go for clean shots
Because the sound sporadically plays, and the wait period is a complete silence, it is important that your AudioClip for this layer is sparkling clean! If they have too much background/ambience noise of that location mixed in, the "bzzz" cut-in and out may be too audible. We will run Looping Clip layer behind this layer in order to create a dynamic ambience at low storage cost.
Also note that even if you clean your birds to be devoid of any location ambience, the remaining audio still has the character of recording location embeded. If you recorded a bird in a cave and clean it up then overlay with your grassland Looping Clip layer, it is not going to sound exactly the same as birds recorded in the grassland in the first place.
When cleaning up audio for the shot, you may lose fidelity in the process of pursuing a pure "sound effect" by various noise removal modules. This can unexpectedly be hid by just playing it at very low volume to drown it out behind Looping Clip layer, sometimes it just sounds bad playing on its own.
Pure positional One Shot Program
Property of this type of layer may suggests you always need Looping Clip layer running below to help filling the void. But what if we delegate that responsibility to the other source?
In some case, you can have an Ambience with just One Shot Program layer. When shot isn't playing, it is a complete silence. How to make this work is to have a different source cover more continuous sound. You gain flexibility to provide different AudioListener falloff curve for the one-shots.
For example in a scene with large forest, but you would rather let the player hear the birds when getting close to a certain big tree. One positional but very big range or globally-heard Ambience maybe playing Looping Clip layer with wind and leaves sound. Then you can have one more Ambience with just birds on that tree with narrower falloff curve.
Steps
One Shot Program is an endless loop of :
- Clip Picking Step : Find out which
AudioClipto play. - Volume Sampling Step : Find out at what volume should we play it from various criterias in the program.
- Play Step : Call
PlayOneShotwith that volume. Can be skipped by chance. - Wait Step : Find out an interval value which is the time in seconds we should wait until Clip Picking Step begins again. Time is then collected every frame until we are at that time.
Fixed / Min-Max value

Whenever you see a UI like this, it is possible to either provide fixed float value (press the X button) or a value which will be randomized from an inclusive range of 2 float (press the [ ] button).
The range option can quickly make the program more dynamic with little effort.
Tip
There is no prevention in editor that you can specify the left range to be higher than the right, despite it is saying "Min". (Preventing such thing by automatically clamping values, etc. caused more frustrations.) In that case, your lower right range will switch place with left at runtime and would function anyways.
Clips
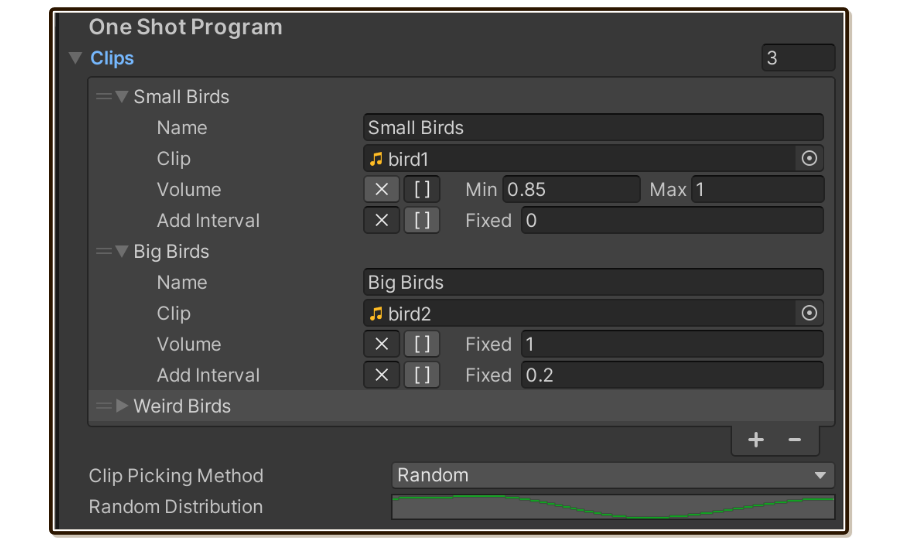
The Clips array let you use many variants of clip instead of just one. Then below, you select Clip Picking Method to either Random or Sequential to make use of this array.
Tip
Enter just 1 member to use a single clip over and over without random or sequential picking.
Tip
To see the nice Clips array like pictured above, it requires Unity 2020.3 LTS to get this new array drawer. If you use Tiny Ambience at the lowest supported version 2019.4 LTS, it will be uglier and lack features such as grab handle or plus/minus buttons.
Two is massively more dynamic than one, just like a combination of 0 and 1 builds up everything in computing. Using 2 or more samples here will make an ambience much better. But to obtain 2 similar but not the same audio is difficult if you don't have skills on editing audio, not recording it on your own (which you will have "takes" to choose from), or purchased audio packs which they may not gave you variants.
On each member :
| Field | Description |
|---|---|
| Name | This just make it display on the Unity array drawer. Why can't it just use a ToString() of the element? |
| Clip | A reference to your AudioClip. |
| Volume | Only multiply to main volume if this clip got selected in picking process. It can be used to tame problematic clips among many variants you want to use in randomization. There is yet another main volume on the outer layer, which is multiplied on top of this one. Due to programming complexity, this initially starts at 0 and requires you to type 1 into it for a better default. (I'm sorry) |
| Add Interval | Only add to main interval (wait time between each shots) if this clip got selected in picking process. The main interval settings on the outer layer adds on top of this one, and it has "From Clip Length" flag that automatically care about the length of picked clip. |
Beware of forgotten clips
Clips you assigned here are still serialized even when you change away from One Shot Program mode. So you can switch to try out other modes and come back to see the same settings.
But these clips aren't used in the other layer modes. Supposed that you decided to not use One Shot Program but forgot the clips in this array. Due to Unity's asset following algorithm when you build your game, they are still included in the build!
Remember to remove them if you decided to use the other layer modes.
Clip Picking Method
Random

Pick a clip to play for each one-shot randomly from the Clips array earlier.
Random Distribution
You may have noticed that dogs can do short barks and long barks, but they are more likely to bark a short clip. The clips inside Clips array can be weighted so some clips are selected more often than others. The graph works like this :
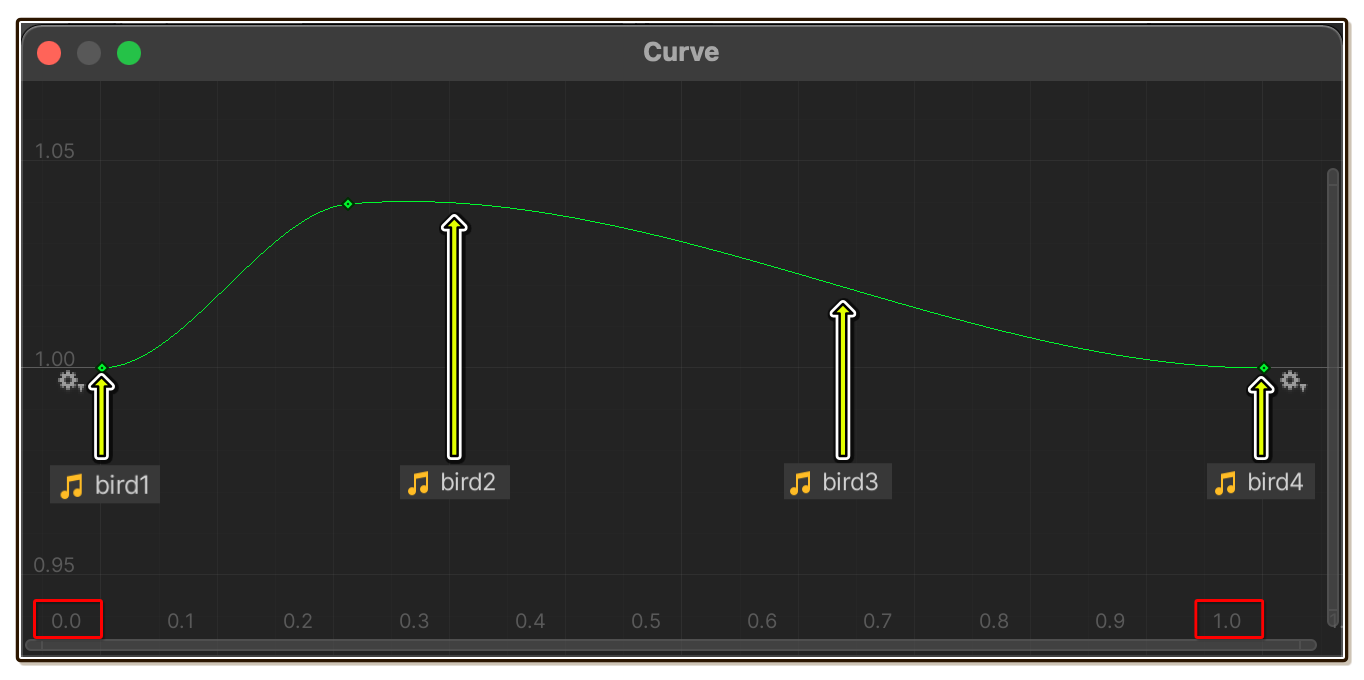
- X Axis : Clips are spreaded out so that the first and last in the array is at the first and the last keyframe. Order the Clips array as desired using the grab handle. Placing the first and last keyframe at
0.0and1.0is optional but recommended so it is easier to imagine where each clips are on the curve. - Y Axis : Can be any positive number. Each clip get an evaluated value that determines relative weight to get selected. In this image,
bird1andbird4have equal chance to be selected, whilebird2is the most likely to be selected. Negative number count as 0 and the clip will never get selected.
Random Exclusion Size
You used randomization to make it more natural, except if it randoms into the same one it sounds even more unnatural than sequential pick! This feature is here to fix this situation.
After any randomized pick, remember that picked member in a queue-like data structure of this specified size. (Pushed oldest one out when over this size.) All clips inside this queue are excluded from the next randomized picking.
That may sounds complicated, let's look at these examples :
- Size 0 : Random using all clips every time, allowing it to pick the same clip again and again if the chance says so.
- Size 1 : Effectively prevents the clip it just randomized to be picked again the next time when you have more than 1 clip to pick from. If there are only 2 clips total, then it would alternate picking one clip and the other.
- Size 2 : Supposed you have got 4 clips : A B C D. The first pick is A. The second pick cannot be A, and it picked C. Now both A and C are in the exclusion queue since the size is 2, the next one must be either B or D. Supposed that it picked D, now the queue is D and C since size is 2. A is now allowed to be picked again along with B which wasn't picked so far. This is one possible randomization sequence out of this settings :
ACDACBACDAC.... (Notice that bad luck caused B to be picked only once.) - Size 3 : If you still got 4 clips : A B C D still, the prior bad luck for B situation won't occur since the size of 3 will eventually force B to be picked if A, C, D are all in the exclusion queue. Using exclusion size equal to clip count - 1 basically says random, but eventually play every clips before going to the new "round".
Size is capped at amount of clips - 1 if you entered more than that.
Sequential
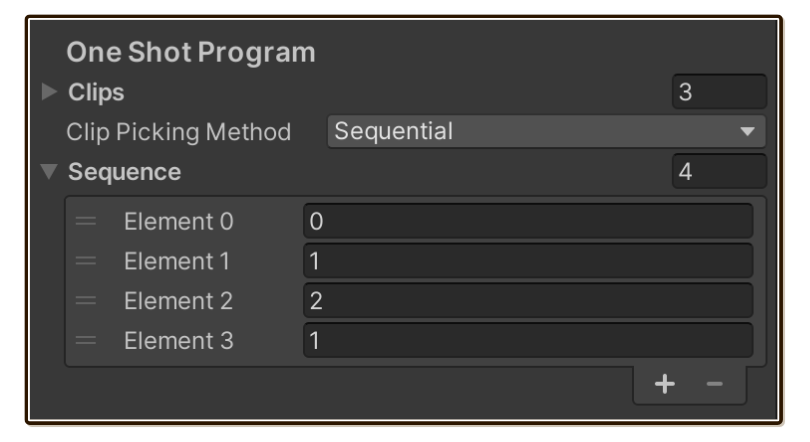
Pick a clip to play for each one-shot in a specified order. Random is not always more "natural". For things with pattern like machine's working, sequential quality may produce better result.
The Sequence array that appears below used zero-based index.
- No sequence at all (it starts out like this) will play sequentially according to Clip array's order.
- It will go in order and repeat from the beginning indefinitely.
- Index out of range will skip that play.
Inputting it 0 1 2 1 like in the example while having 3 clips in the array will make the the play goes like this 0 1 2 1 0 1 2 1 ...
Intentionally using -1 inside the sequence to force index out of range can create interesting rhythm where it skips exactly where you want it.
Volume

Recall that classical audioSource.PlayOneShot can accept a clip and a special volume which does not affect the other shots.
After picked a clip by either random or sequential, next we have to determine that volume.
- The picked clip already contains volume. That volume will be multiplied with this outer volume. You can choose from fixed value or randomize from a range.
- You can make it multiply one more time with Volume Automation.
Volume Automation
This is a time-dependent automation on volume.
Imagine a windmill that is not in perfect condition. In one revolution, there are something that makes the volume louder than usual.
This behaviour must repeat again and again rather than completely randomized. This settings is great for that kind of thing.
- X Axis : Time in seconds. As the layer's time goes on, you can get a varying number from evaluated Y axis.
- Y Axis : A number to multiply one last time to the volume before it is used with
PlayOneShot. Therefore "do nothing" is 1, not 0.
Volume remains static throughout the shot
The volume will not change while the shot is playing. The volume number picking only occurs once when the shot is going to play, unlike Volume Automation in Looping Clip which swings live while the audio is playing.
This is not a bug. Often this is an expected behaviour for one-shots.
For example, if you automate bird noises, you want an impression of a bird that maybe living on closer trees or further away trees. If it should chirp, the automation picks which tree it lives on and locks on that volume for the duration of one-shot. A chirp that ramps up volume inside the shot sounds more like a bug.
Interval

Interval refers to the time it should wait before playing the next shot.
- The picked clip already contains interval. That interval will be added with this outer interval. You can choose from fixed value or randomize from a range.
- You can make it add one more time with Interval Automation.
Modeling nature with interval range
Interval feature may make you think of mechanical objects. You may think things from nature wouldn't be so predictable and requires wildly swinging interval.
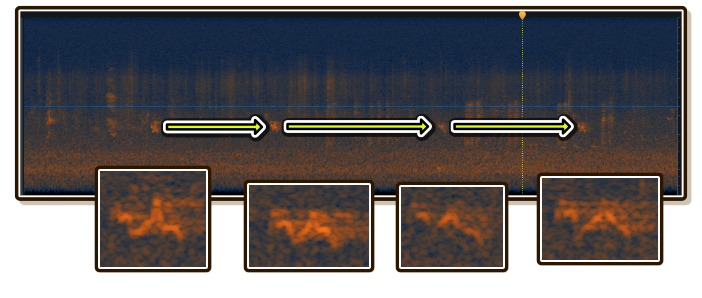
But look at this a spectogram of public park with bird noises. The zoomed in part is the same bird. Why did it make noise spaced out quite equally?
Thunders in heavy rain may not come so regularly, but if you sit around and time an interval between thunders, the interval you obtained maybe surprisingly close. In other words, if it just went down, it is unlikely to occur again immediately as it needs some more time to charge up again, then discharge is more and more likely with enough energy. If you haven't heard one for longer than expect, probably there is no more.
These suggests there are good number for small range of randomized intervals rather than completely random. The [ ] (inclusive random from range) button for Interval field is perfect for modeling this kind of characteristic.
Interval Mode
Interval defaults to From Clip Length. An interval of 0 on this mode does not mean playing repeatedly with no pause, but rather play right after the clip ends.
That mode implies you cannot have overlapping one-shot. But if you change the mode to From Play, it counts from the moment it PlayOneShot, not of from the end of clip. Overlapping shots are now possible, just enter a value lower than clip's length.
Interval Automation
Something like train sound has interesting varying intervals that loops in pattern. (e.g. ka-chak--ka-chak--- where - represents 1 time unit.) This is due to wheel design and also distance of the railings. This settings maybe suitable for some niche ambiences like this.
Everything works like Volume Automation except :
- The value is added to the interval one last time.
- Because it is an addition, the value to "do nothing" is 0. (Not 1)
Chance

This settings can make the one-shot "miss".
On each play, it use Random.range to get a value from 0.0 to 1.0. If it is lower than Chance value we obtained here, it is a "miss" and the shot is not played. We continue to wait for the next shot and determine the chance again. Clip picking process begins once again too, not even retrying the clip that was missed.
Therefore the default value that will always play the shot is 1.0.
Chance Max Misses
This can ensure the one-shot is eventually played if it got bad luck and missed consecutively too many times.
After missing consecutively for this specified amount, the next play will have 100% chance regardless of settings.
Use 0 to turn off this feature.
Pop-up Inspector
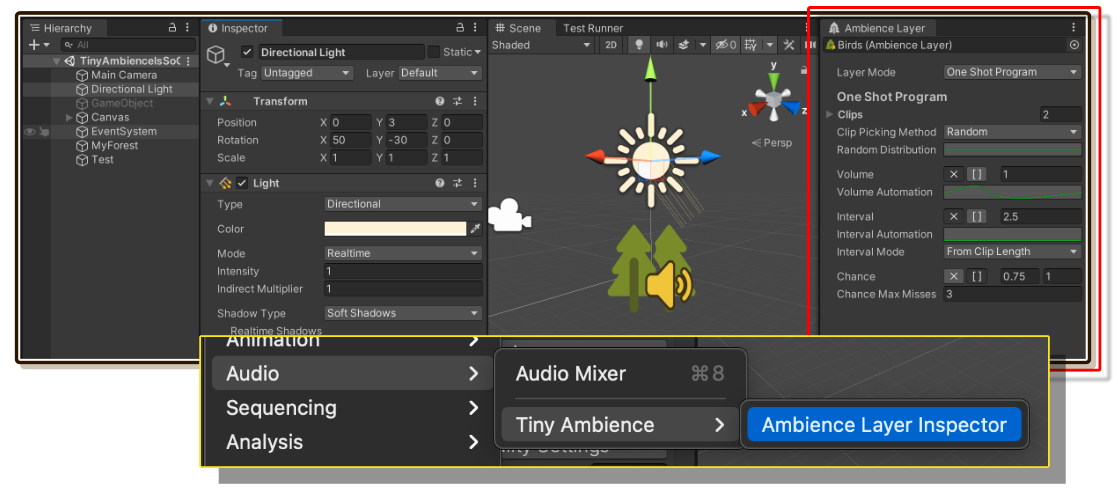
While working with One Shot Program you may need to hog the Inspector for long time.
Instead, you can use Window > Audio > Tiny Ambience > Ambience Layer Inspector to get a dedicated dockable window that can inspect 1 AmbienceLayer. Use the object picker up top to change an AmbienceLayer you want to work on.
With this, it is possible to use the Inspector for anything else while tuning an ambience in Play Mode.
Some notes for all automations
Making the automation loop
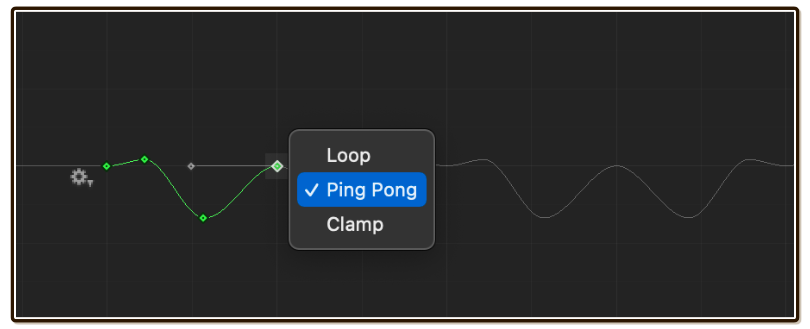
You may expect your automation to loop automatically, but it won't. Your curve starts with Clamp mode which retains the value of the last keyframe.
You must change Wrap Mode at the right edge. Click on the cog wheel at the edge and select Loop or Ping Pong as desired.
Deleting automation
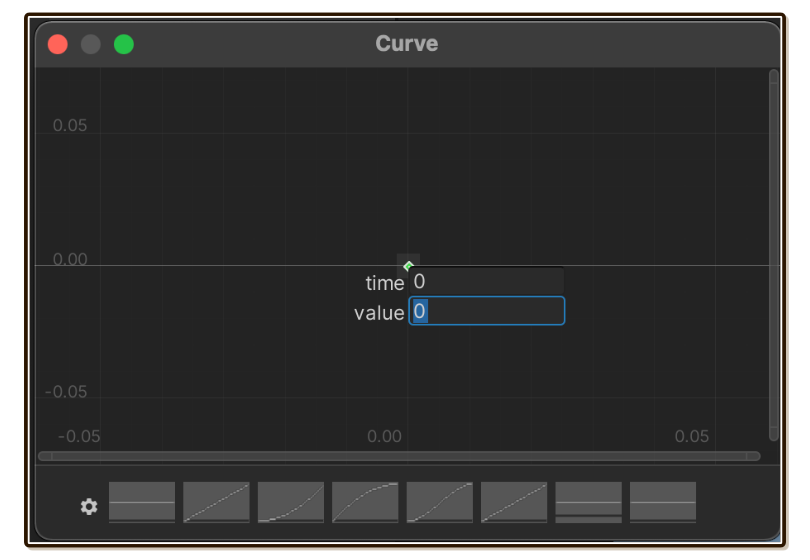
Tiny Ambience has a special case about the curves : If the curve has 1 keyframe no matter what time or value that keyframe is, the curve is ignored.
Unity has one UX problem about the curve, you cannot remove all keyframes. Pressing Cmd/Ctrl + A to select all keyframes then press Delete will left 1 keyframe and it is even not reset to time 0 value 0.
This create some problem in removing the curve. Sometimes the curve to mean "nothing" is a constant 1 (like volume, because multiplication identity is 1), but sometimes the curve to mean nothing is a constant 0 (like interval addition). With this special case, you can Cmd/Ctrl + A and Delete with ease to turn it off.
To create a constant curve without hitting this special case, please put in at least 2 keyframes with the same values.
Combining layers into an Ambience
- Getting Started/Ambience : When you have made sufficient amount of layers, it is time to create an
Ambiencethat is ready to play.