Getting Started
Here's how to play your first audio with Introloop.
Installation
First you should license this plugin from Unity's Asset Store. Then, two ways of importing.
The old, imported approach
Import normally using the Asset Store tab in Unity. It basically an unzip to merge into your game. After importing, a folder Assets/Introloop will appear in your project's Root.
After 2019.3 Unity Package Manager could manage Asset Store package you have purchased too. After purchased you don't have to use Asset Store tab anymore. "Import" button does the same thing as the one in Asset Store tab.
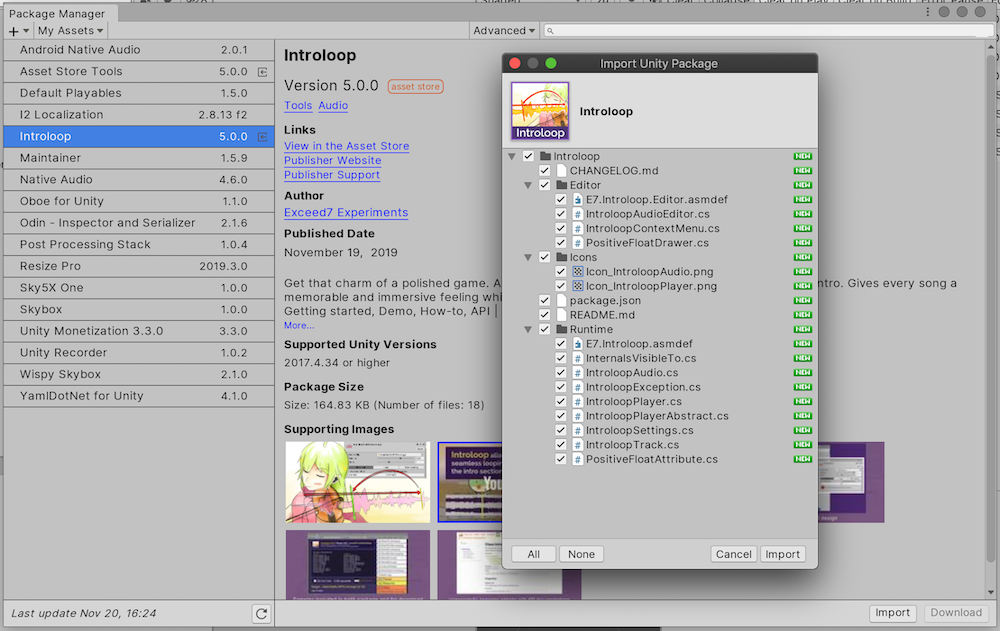
The new, awesome packaged approach
Since this package is designed to be Unity Package Manager (UPM) compatible, you may just "link" to the package while not actually polluting your Assets folder with plugins.
After installing via the normal way, you can move the package somewhere else in your computer then use local UPM linking. You can do this to multiple projects too since it is a linking, not importing.
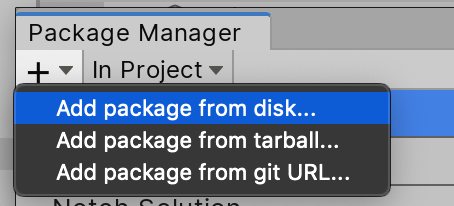
It then appears in the Packages section instead of Assets section. Assets section remains only your game, and you have no worry about "where and what did it do to my project" since it is now linked instead. Clean!
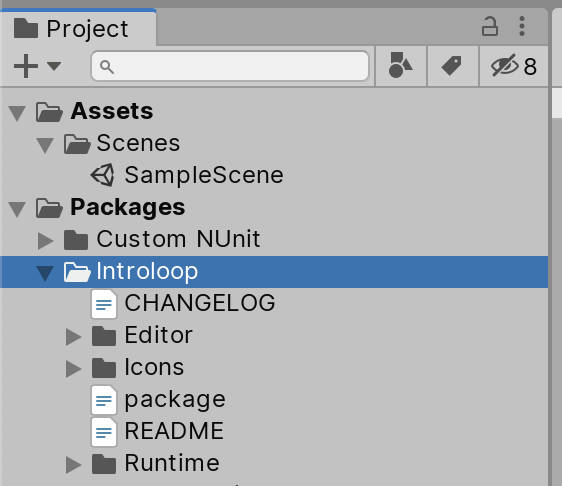
Introloop is organized in an Assembly Definition Files (asmdef) named E7.Introloop (GUID : 8a18b43bbefca455abece4fd62e82bba). Link your assembly to it to gain access to using E7.Introloop; namespace in your code.
Finding boundaries
After you got an audio that you would like to play we will need 2 time points.
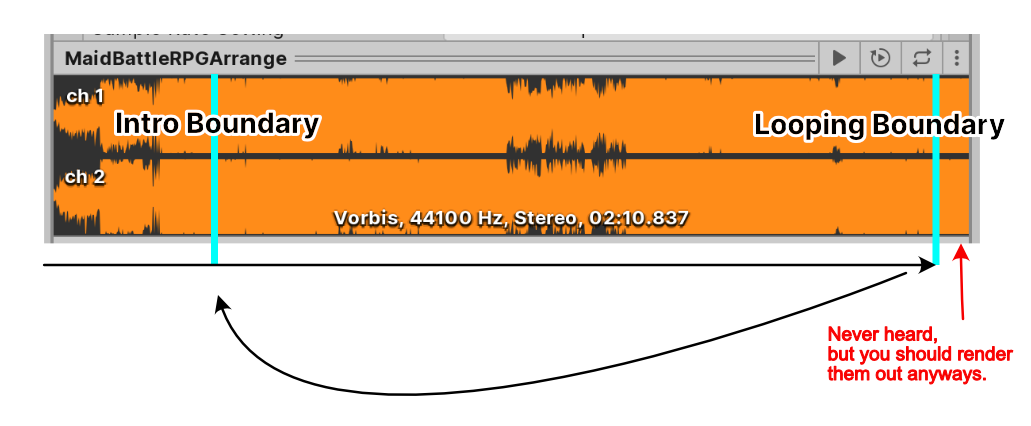
- The first point is called "Intro Boundary" which is the point that separates an intro from the rest of the song.
- The 2nd point is "Looping Boundary". When the playhead arrives at this point it will go back to Intro Boundary.
By these definitions :
- The audio bits after both boundaries should sound exactly the same.
- The audio after Looping Boundary will never be heard if Introloop works perfectly.
- So technically the Looping Boundary is useless as it will always be at the very end of audio file. However it is recommended to have a bit more audio (~1s) after that just in case the schedule fails to meet.
With access to your music composer
If possible you should ask these point directly from your composer, since in the Digital Audio Workstation (DAW) there is a beat grid to snap to and it is a sure fire way to get the exact time!
Introloop is also natural for the composer. Almost all DAW has a "loop bracket" function. You can start playing before the left edge of the bracket, but once the playhead is inside and finally arrives at the right edge then it loops back to the left edge.
Introloop make the composer very comfortable as he see what the game would play like what he can preview on the DAW. Exporting the song is easy as he can export the whole song without any special care like having to export twice to cut them up for the developer.
If possible please tell the composer to have that "a bit more audio (~1s)" after the looping boundary and render them out too. This is the only special care Introloop needs, but most of the time schedule works and they won't be heard.
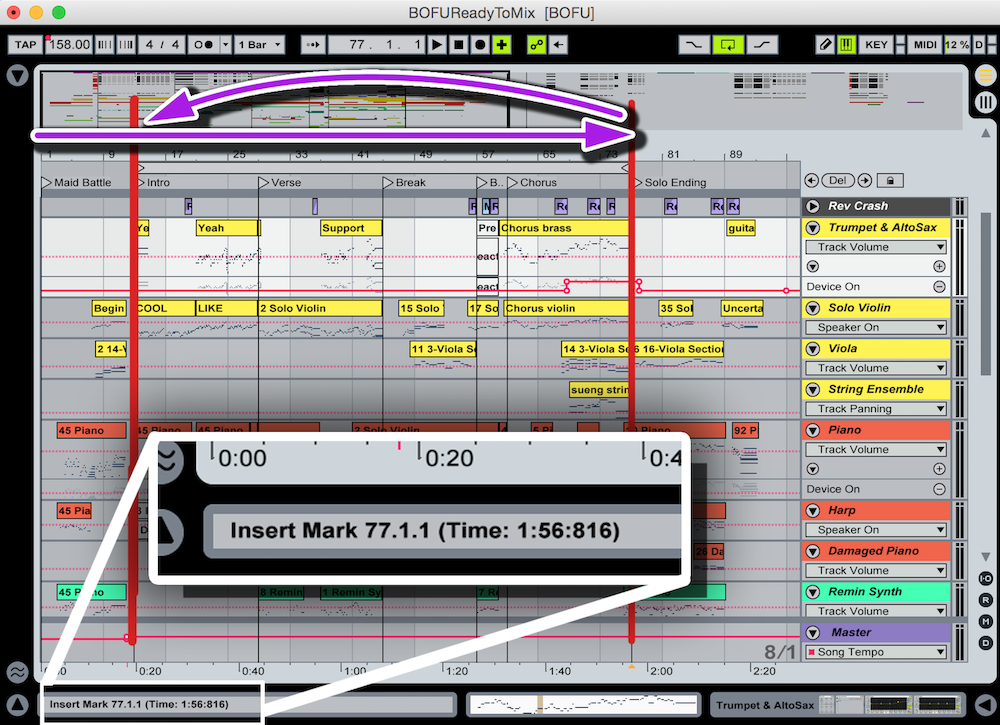
What if I already have the music but cannot contact my composer?
In this situation you can use a free program like Audacity to find the Intro and Looping Boundary by yourself. Timing might be difficult since there is no snap, but zooming closely to the waveform you should see a meaningful transient that you can match. There is an article from the Audacity team of how to make a looping audio. If you follow the guide and successfully cut a looping part, you have already got 2 time points required for Introloop which is the begining and end point that you cut.

Setting up IntroloopAudio asset file from an imported AudioClip
Right click an imported AudioClip in Unity then Create > Introloop > IntroloopAudio. A new asset file should appear alongside your original audio file.
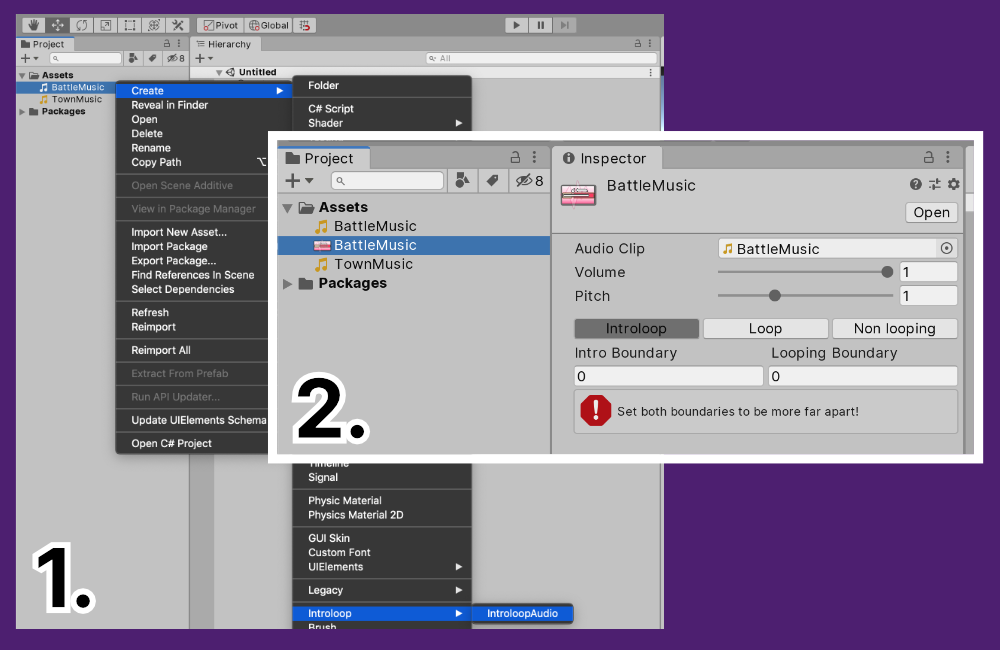
This is called an IntroloopAudio file. You will use this file instead of original audio as an input to the IntroloopPlayer which replaces AudioSoure.
You don't delete the original audio file from the project, this IntroloopAudio has a link to the AudioClip as you can see by inspecting the file.
Next, you should enter the Intro Boundary and Looping Boundary time value you got earlier in seconds.
You can also set a default volume here which is convenient for balancing music level, since normally Unity cannot store playback volume information in the AudioClip directly. You can also set a constant pitch modification that applies on play.
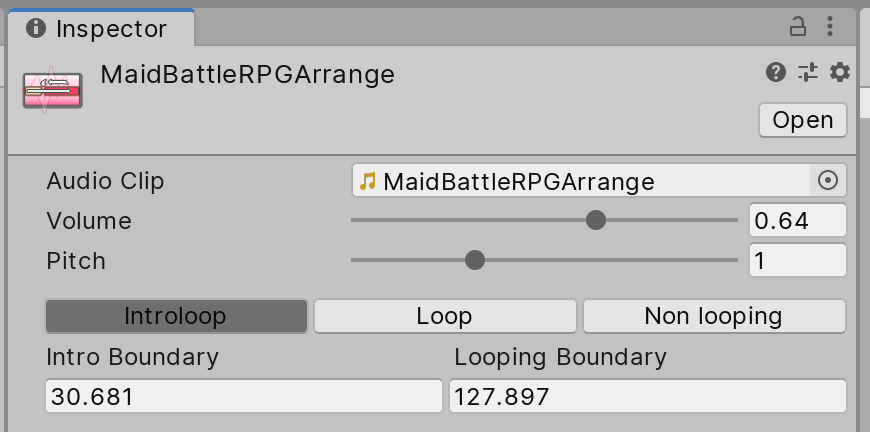
There are 3 playback modes to choose from which you can set per audio.
- The Introloop mode is the point of this plugin.
- Loop and Non looping is for playing like Unity normally did with
loopchecked and unchecked inAudioSourcerespectively. For these 2 modes the boundaries is ignored, but they are for interoperability with introlooping audio. You can crossfade from introlooping audio to a non-looping audio. Auto audio unloading, volume per music, etc. benefits are there. You can use the same method set to play them. Also, Introloop's Loop mode is not using a regularAudioSource'sloop, but using the same precise scheduling methods used to implement the Introloop mode. You could try this if regular looping wasn't accurate enough for you.
Play IntroloopAudio asset with the IntroloopPlayer singleton instance
First of all include the namespace using E7.Introloop; to your file. Make sure you have already link up the Assembly Definition Files (asmdef), to Introloop's E7.Introloop.
In any of your component script, declare public IntroloopAudio myIntroloopAudio; in your script to expose the variable to your inspector. Then drag the IntroloopAudio asset file to the slot. Next we need an IntroloopPlayer to play this IntroloopAudio.
I have prepare the easiest way as a singleton. By calling a static property IntroloopPlayer.Instance for the first time, a set of game objects which ultimately consists of 4 AudioSource inside will be created under the scene DontDestroyOnLoad. It will persists indefinitely and does not stop playing a song even if you load a next scene with LoadSceneMode.Single.
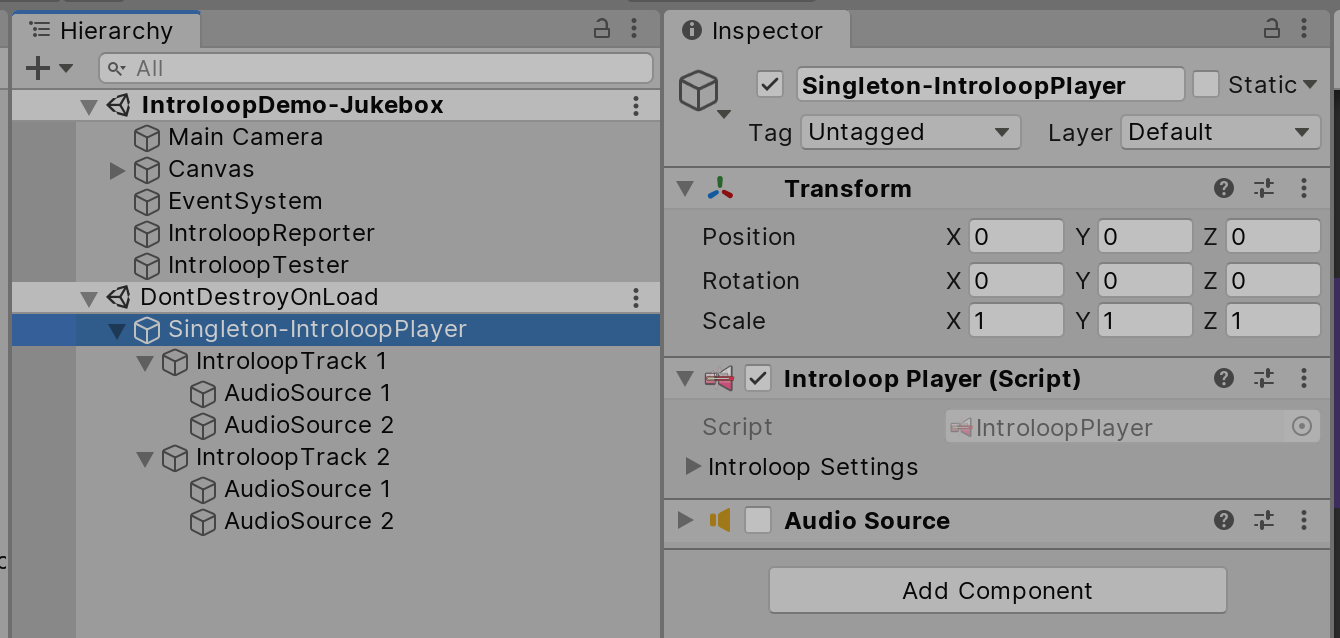
After getting the player via singleton, just IntroloopPlayer.Instance.Play(myIntroloopAudio); you should already be able to hear seamlessly looping audio with intro!
The image below demonstrate a simple wrapper class that is there just to hold multiple IntroloopAudio assets (assigned in the exposed inspector) to give to the singleton player. Then I can choose which asset to play.

Routing Introloop audio to an AudioMixerGroup
It is very useful to have your music actually going to the BGM channel instead of master in Unity's mixer. Then it is easy to implement a BGM level slider in the option screen in your game.
With IntroloopPlayer seemingly coming from thin air (singleton spawned), how can we specify a game-specific settings like an AudioMixerGroup in your project where I as a package author has no knowledge of?
Introducing the template prefab. On your first call of IntroloopPlayer.Instance, Introloop will look in your Asset/Resources/Introloop/ folder. If it found a prefab named exactly IntroloopPlayer then that will be Instantiate as your player instead!
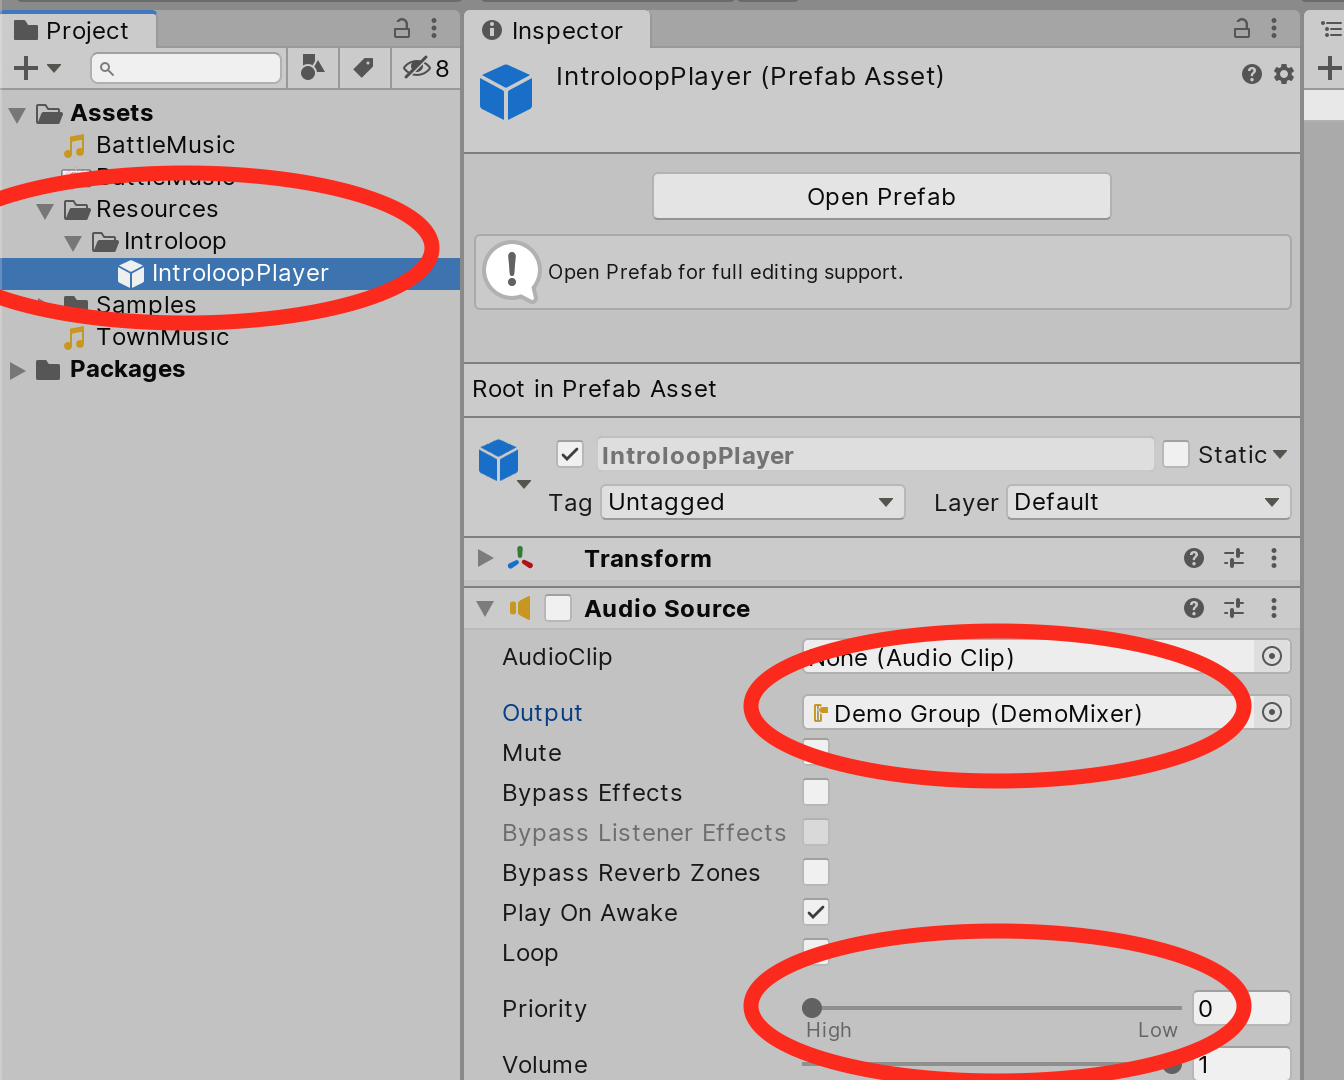
What's special is that if this prefab has an AudioSource on it, it will be considered a template AudioSource. At runtime all 4 underlying AudioSource inherits the same settings as template AudioSource. Therefore, you can set AudioMixerGroup here and enjoy the singleton spawned with the same mixer connected. The singleton is now tailored to your game.
Because it inherits almost everything, it is generally recommended to also set priority on this template AudioSource to 0 as otherwise it will inherit the value 128, and some busy scene with a lot of sound effects may cut off your music. (Without template prefab the priority has been default to 0.)
So let's create a game object like this in any scene and drag to Resources/Introloop/ to have it become a prefab. Then delete the one on the scene. You can have just AudioSource on this prefab, missing IntroloopPlayer component could be added automatically.
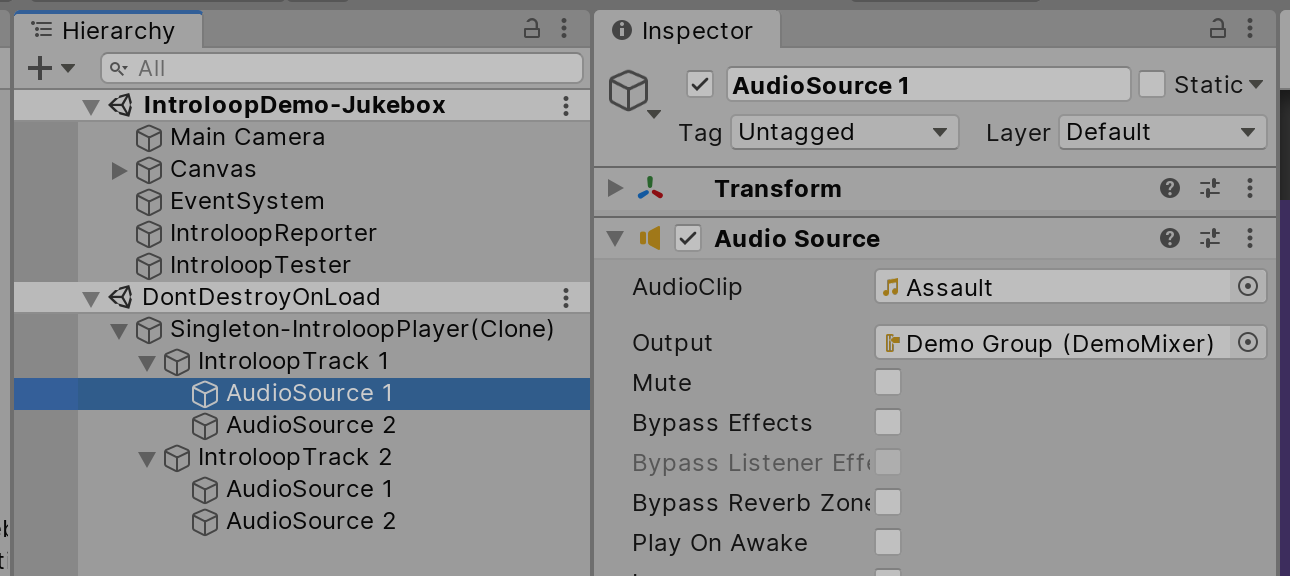
You can see (Clone) on the name, indicating that the singleton is now from Instantiate. Looking into any AudioSource inside, you can see an inherited AudioMixerGroup and priority.