Editing Techniques
I will add more to this page as I encounters new problems!
What is what?
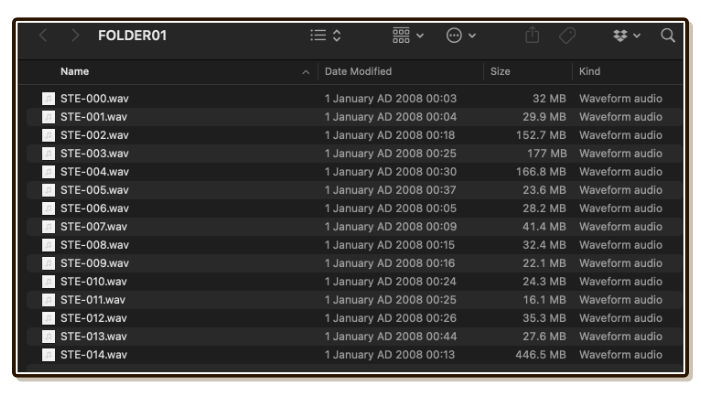
The first step is to choose a file to work on. Try naming the file on-location or jot in some papers, or you will be greeted with this horror at your computer.
If you can't, skim through them and rename before you start working one by one before your memory fades away.
Universal Category System (UCS)
I highly recommend you to learn about Universal Category System (UCS). It is an initiative by a group of audio engineers to assign a single CatID to any sounds in the world. There are more than 600+ CatID available and they hope those could cover most sounds. For an initiative to work, they need adopters. I think we should join them!
An idea is that each CatID can be exploded into a category and subcategory, and also synonyms in different languages. Making the task of determining just the right CatID tags a bunch of useful metadata for your audio automatically. Determining CatID quickly is something you need to master from now on by skimming through available categories and sub-categories.
After visiting that page and go through some of their videos, you can name or add metadata to the clip in a manner that has high compatibility with many more things. Out in the field you may not be able to exactly follow the specs, but try to get it close then perfect them now that you are at editing stage. If you are not planned to store raw field recording for later use, you can follow UCS after you are done cleaning up and cutting up pieces from your recordings.
Using the spectogram
The usual audio waves are just loudness, and in ambiences, those loudness are hardly informative because you don't know what's being loud over there. Ambiences sometimes does not have much dynamics and the wave looks almost the same.
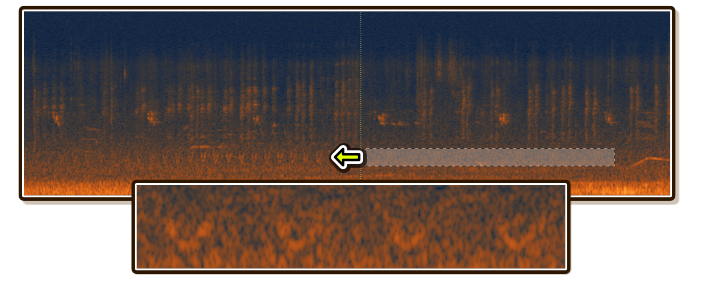
Instead, try spectogram view in your editing application which laid out each frequency vertically in place of loudness. Loudness is instead the color intensity.

In this example, just after I loaded this audio, this spectogram instantly reminds me what happened at the scene from these colored shapes without listening to this entire 10 minutes recording.
There were interesting birds (upper frequencies), but along the way I got some motorcycle revving from miles away (curvy lines on the lower frequencies). Based on this visual, I can either try to remove the motorcycle or work on section without it but the birds are still present.
The visual nature of spectogram may allow you to lasso/magic wand select and get rid or export just that audio content depending on the software you used!
This example I was recording ambience in the park where ambulance sirens (repeating U shape in the spectogram) fades into the scene. There were good wind blowing that I want in this section. With rectangle selection on "idle" ambience where the ambulance bus is already gone, I can paste that to instantly remove just the sirens and preserving other stuff on the higher frequency!
Advanced tooling could be less manual than this, requiring you to only highlight unwanted area and with a few clicks it will search and fix that spot for you!.
Programs for cleaning up
Before start finding useful sections in your long recording to cut out, we should sanitize the whole file first. These program should at least be able to see the spectogram.
RX
RX is a paid program for cleaning up raw audio from iZotope I recommend. In my opinion it has no competition, and lower editions are reasonably priced if you look for sales which happens all the time. (Advanced version never goes on sale, Elements pretty often, and Standard may be often on sale as a bundle with other things.)
If you are wondering other uses in the future to justify the purchase, think of any video project with microphone-recorded sounds. Maybe you are already a musician or considered starting in the future, then your recording can be fixed in more ways especially for instruments without direct line-in or pickups. The software can be bought without subscription and can install in multiple machines, on both Windows and macOS in one purchase.
It will be too much to teach you how to use RX, so I will list out useful ambience clean up effects and their uses here. E denotes it is available in Elements, S denotes it is available in Standard. I will not list effects from Advanced version since probably only few of us can afford that. I wouldn't get it for this purpose. Look at the comparison of features of each version here.
- Normalize/Gain (E, S) : Brings the volume up. Usually the first step before you do something.
- EQ (S) : Common operation is to cut low end then gently boost high end where you want them to shine. But oh no! They are so stinky to not even give EQ to Elements version. Luckily Elements version can host 3rd party plugins. There are tons of free EQ plugins out there.
- Loudness Control (S) : Let's say this let you tinker more than normalize, only make something you want louder.
- Spectral De-noise (S) : Voice De-noise that is more surgical. If noise is evolving, then this has more chance to remove it since it operates in spectral level. For maximum effectiveness, make sure you have recorded some pure noise in your recordings so it could "learn". If you have just Elements, you can try Voice De-noise instead.
- Voice De-noise (E, S) : Perhaps the most useful tool that is also available in Elements. Despite it saying "voice", it works quite well with most ambiences that you want to use with One Shot Program. (Remove noise, so you can overlay it on variety kind of noise floor.)
- Spectral Editor (S) : You can area select what you see with rectangle/brush/magic wand tool just like in Photoshop and delete, copy-paste cover up, hear just the selection, hear except the selection, or even export just the selection!
- Spectial Repair (S) : This is an equivalent of Spot Removal tool in Photoshop. Instead of you finding something to paste over the problematic area, it do that for you! Search and repair criteria are pretty diverse, for example, horizontal/vertical search, attenuate vs. replace repair, etc. One of the most compelling reason to get Standard.
You can either save an entire cleaned up long audio then work inside Digital Audio Workstation (DAW) software, or paint-select what you want and export right from RX. In DAW, they have tracks which can be used liberally for organization or experimentation, better manage your effect chains.
Audacity
You can use Audacity if you want to go open source. In my opinion, features asides, they still not quite catch up in terms of UX to the paid alternative.
The most important is perhaps to work on Spectogram View which isn't on by default compared to RX. You don't want to listen to your 10 minutes recording. You want to see it and knows exactly what is going on. (Especially when you remembered something happened mid-recording, it will be obvious.)
Note that one of very cool feature in RX that let you use reasonable selection method with Spectral Editor seems to be becoming reality in Audacity from this blog post. It could be powerful alternative to RX Standard when it arrives.
I can't guide you through Audacity's effects that deals with ambiences because I had not actually use it in production.
Adobe Audition
For completeness. But I don't like the subscription model. It is too stressful.
Digital Audio Workstation
The DAW is a bit different from audio processing softwares, as they are made to compose music. The requirement for that is multiple tracks and a timeline that you can piece up clips flexibly. Dedicated audio editing software generally works on per-file basis.
DAW maybe less specialized but you can make use of them. Personally, I edit in RX first then piece up in DAW for more fiddly operations. I don't adjust the sound quality anymore in the DAW, just try something like making a seamless loop, or cut up more pieces out of cleaned up audio.
My choice of DAW is Ableton Live, which has unique minimally colored and compact geometric UI that I like. It has full 30-day trial. Other choices I familliar with are :
- Studio One : Has a completely free version callled Studio One Prime.
- FL Studio : Has lifetime upgrage and unlimited free trial just that you can't save the project. Which in field recording unlike music composing, you may not need to save.
Other choices you may look up on your own : Cubase, Logic Pro, Reason Studio, Bitwig Studio, Reaper.
Always think back to the raw audio
It is easy to lose track of how the audio is supposed to sound like when you clean it up, because "cleanliness" (no noises, etc.) deceptively tells you that you are going the right way.
Often I arrived at very clean sound that doesn't sound like what I want anymore. At that point it is difficult to think at which step the sound loses its character. Let's pay attention on each step did you trade an actual audio out too much in pursuit of cleaning it up? Some artifacts can be left in the clip just fine, it is annoying right now because you are listening to it alone without anything else in your game.
Cutting
You'll definitely want to cut your long recordings to use in game, which a difficult choice is where to draw the line. The sound is seemingly continuous and everything is interesting!
Mainly you will need to know the 3 layer modes that Tiny Ambience has to offer in order to decide to cut something for use :
- Looping Clip : You may cut out a very short section to be used as constantly looping noise floor when any other things aren't happening. By very short I recommends 10 seconds or so. Compress down later when this size takes too much space of your game.
- One Shot Program : Focus on getting a clean unit of "shot". The boundary should not split something in half. And aim or edit for as low ambience noise as possible, so you can cleanly overlay it on top of Looping Clip layer that is constantly running as a base. Recommended to always add short fades on the left and right of your cut to reduce pops/clicks when a shot is suddenly fired.
- Timeline : Cuts can be lenient as a material for this mode, as you can fade in Timeline tab to make it works.
Avoiding unusable bits
Generally you should record long so you have alternatives to choose from. You will not believe how many that you recorded will be a dud.
After specifying the boundary to cut, try playing it repeatedly. Many times this will reveal that there is in fact something undesirable behind it! For example, my footstep sound was once overlayed with some very faint woman's voice from somewhere. When listening as long file I didn't notice it. But after I cut out my footstep and try playing it repeatedly (as it would be used in game) I started hearing this woman very clearly.
Cutting out seamless loop
After cleaning up unwanted artifacts by patching it on the spectogram, usually it is time to cut out a seamlessly looping part. See various techniques in its dedicated page!
Volume
You can use various effects to normalize or perform volume control. It is generally good idea to make it a little louder so in games you can apply it for both loud or quieter place with volume adjustments.
But don't maximize it even if it cause no clipping at all, especially if that is a SFX meant to be played quietly for One Shot Program layer.
Of course Tiny Ambience can lower the volume later, but I once maximized my birds and now even 0.01 on the volume adjustment isn't enough to make it as quiet as I like! (Not enough floating point resolution to get exactly what I want.) Aim for -12 to -6 dB ceiling maybe good idea.
Adding fades
If you are cutting for One Shot Program layer, very small fade at the left of clip can always help with reducing sudden pops and clicks. Don't add too much here as it will change an impression of the sound. If you inteneded to use this clip in Timeline layer, you can always add fade layer which can be in different length. If you are aiming for Looping Clip layer, do not add any fades as that would ruin the seamless loop.
Fade on the right is very useful for One Shot Program layer, it helps the shot blends back into whatever Looping Clip layer or Timeline layer is currently playing better.
Sometimes you will find this dilemma : Cutting at length X makes a complete clip but the end bit has some undesirable audio. Cutting at X-1 now lose much of the character of this clip. The solution is to carefully draw a fade curve to balance the best of both.
EQ (Per clip)
You have take care of unwanted frequency (usually low end) at clean up phase. Now you should do it again but tailored per cuts you made.
If you are making multiple clips as variants (e.g. for use with Random clip picking of One Shot Program layer), EQ can make all variants sounds more like they are in the same set.
Dynamics
Dynamics is a difference of the loudest part and quietest part in a clip. If you just adjust the clip's volume, everything goes louder or quieter together so you aren't changing dynamics.
At this step you may process the dynamics to your liking. For example, if I recorded a wooden water mill spinning which consists of louder mechanical sound and lower water splash sound. With dynamics processing effect, I can keep the water splash as loud as before but reduce just the mechanical sound since the effect can detect higher attack peaks of those.
"Compressor" is an example of this kind of effect, which you can lower the threshold until it shave off aggressive peaks out for you, leaving lower peaks untouched. There are many other kinds.
An another rough way to narrow dynamics is to "slam" into some kind of limiter effect. Instead of lower the threshold to shave off peaks, you set the limiter's threshold and then increase volume of your clip into it instead. This sledgehammer approach produces densely packed, aggressively processed sound. Sounds like bad idea, but some sound may need this kind of rough character.
Gate
A problem inverse to dynamics processing is to make some part that deemed too quiet to be instead completely gone.
Gate effect works inversely, the threshold is instead rising from the floor instead of coming down from above. Whenever original audio drops below this point, it is instead completely gone. (You can set gentle slope which it will cut off.)
Gating is very useful in our use case to cut out noise floor and background ambience when you are making clips for One Shot Program layer. If you can make the clip location-independent, then this clip can be reused in more generic ways.
However the remaining audio after gating may already have character from the location embeded, which Gate can do nothing about. If you recorded some birds from the cave, no matter how clean you gate the noise out, the birds will still sounds like they came from the cave.
Reducing Stereo
You may have recorded in a very good pair of stereo microphone, but sometimes mono or less stereo is better!
Sometimes the stereo can be too good it make you turn your head. I once used an overly realistic ambience recording that got a bit of cars coming from behind me. When I audition it in audio editing software, I automatically look behind myself everytime. I find that distracting in games...
Sounds in the real world are actually all mono, until it reaches you and you happen to have 2 ears. Stereo clip is just to simulate that, but stereo in real world feels great because it changes according to orientation of your head.
In first person game, we often change L R mixing based on the facing of camera of the character in the game. In this case, the most realistic simulation is actually have everything in mono. Stereo instead came from positional mixing.
In top-down game, we also often don't change stereo based on which way the character is facing but the player playing the game is hearing the action "from above". In this case it maybe useful to have more stereo.
There are "spatial audio" features released for listening to music that mix by head tracking too!
In summary, stereo wider or narrower needs to be decided depending on style of game and implementation of audio in the game.
Error in microphone direction make the recorded sound weird when listening. For example, if you record your own footstep and is holding microphone in-between your legs, that will sounds like 2 people are walking on the side of you! The player expected footstep sound heard from more natural place, like in front of the walking person. You can rescue the recording by narrowing stereo image instead of recording it again.
In music editing software, you should look for effects that widens stereo image. Usually the settings will also allow narrowing the stereo as much as you like. (As opposed to just turning it into 100% mono.)
Turning it completely into mono will cut space requirement in half, also useful for long clip that you think stereo doesn't really matter. You can try if compression is not enough or cannot compress anymore.
Effects
Positioning Effects
Positioning effects refers to something like shimmer, phaser, auto-panner, convolution reverb, etc. that doesn't alienate the audio content too much, but appears to "move" the audio to different place. Convolution reverb is excellent to improve realism, it is by definition make the sound come from places rather than being too dry. Also it make the sound "yours" even though you use other people's field recordings.
Adding effects and bake the result into the file may make the audio less versatile in-game. But game engine's audio effect often applies to too many things than you like, and maybe quality is too low. Unity one is designed for real-time usage with wide compatibility on deploy targets, and so naturally not as good as VST plugins.
I added some chicken One Shot Program that would sound once every 20 seconds, but once that triggered it was so "in the face"! Instead of adding reverb in Unity, it is better to reverb the Chicken from outside with high quality plugins.
When doing something like this, positioning the audio source in the game may look a bit unrealistic. For example, I want this reverbed chicken to appears that they came from the other side of the mountain. (The field is vast, so you can hear them from miles away.) An actual ambience source position wouldn't be at the other side of the mountain, but instead right in your face. (Because it is playing a pre-reverbed clips.)
Creative Effects
Ambiences are quite versatile when adding unassuming effects. For example, some amp/guitar effect simulation can turn gentle river stream into more foamy and aggressive waterfall. Analog effects tends to play well with natural sounds. (Rather than for example, bit crusher or vocoder.)
The "short loop disillusion" problem
One significant problem in game ambience is that the loop must be short (5-10 seconds) to save space, but when the loop is short player starts noticing a pattern of weird sounds, despite it being naturally recorded.
Nature's sound is natural because it never repeats. When we loop it, we have added rigid, digital quality to the audio by creating relationship that every X seconds this moment will occur again. (And therefore, give away what is going to occur next soon after.) In extreme case, I was able to "sing" some ambiences of the game I am working on!
Tiny Ambience has tutorial and tools to exploit syncopation in order to lessen this disillusion, but you should also make sure each individual clip that will build up the syncopation is in itself free of this problem as much as possible before stacking them up.
To combat this problem in the scope of a single file, keep listening to the loop after you have finished your cut for 10-20 repetitions or so. You will be surprised that you could be annoyed by weird bits in the audio that was sounding OK in the original recorded clip. Then after identifying that bit in the spectogram, surgically copy the part that didn't stand out and paste over it. Then check again if that bandage fix creates yet another weird repetition or not.